

Oh snap!
That's sexy, G!!
E
New Cocobolo Jumbo
-
whitespruce

- Site Admin
- Posts: 4367
- Joined: Thu Aug 21, 2008 6:53 am
- Include Off Topic: Yes
- Location: Northern Minnesota, USA
Re: New Cocobolo Jumbo
I been working on some repairs on an old 1860's Martin 2-19, so in between gluing cracks on that I have been bracing the back on my jumbo. I am bracing the back now because it is the thing that is ready to do and something I can do in short intervals of time. I do a double "X" laminated brace thing that I build up out of layers of strips. I have been taking photos as I go and will post them tomorrow. Need to take off for a concert in a couple of hours.
Oh, and I will start a thread on the repairs to the old Martin when I get that up to a stopping point, too.
G
Oh, and I will start a thread on the repairs to the old Martin when I get that up to a stopping point, too.
G
-
whitespruce
- Site Admin
- Posts: 4367
- Joined: Thu Aug 21, 2008 6:53 am
- Include Off Topic: Yes
- Location: Northern Minnesota, USA
Re: New Cocobolo Jumbo
OK, here is the skinny on the back bracing.
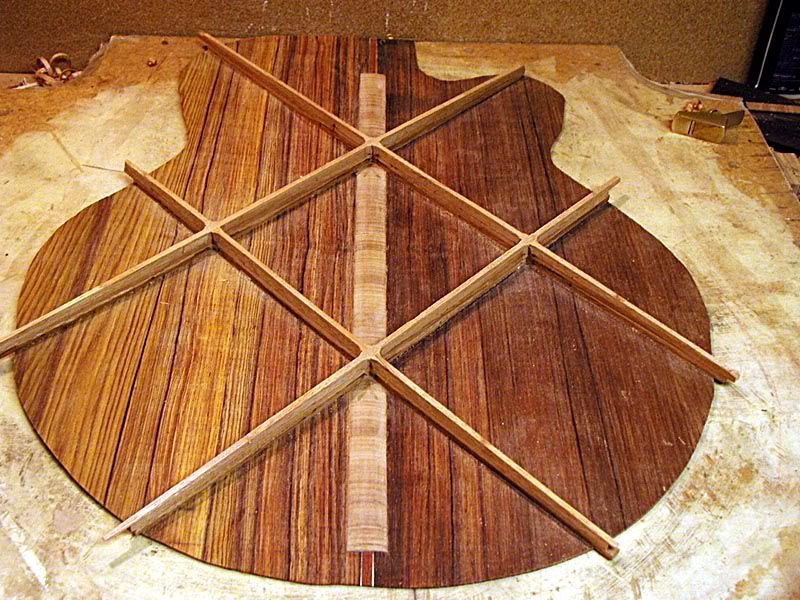
On my last 3 guitars, I have been using a double "X" back bracing laminated out of layers of strips. The strips are 3/16" wide by 5/32" thick.
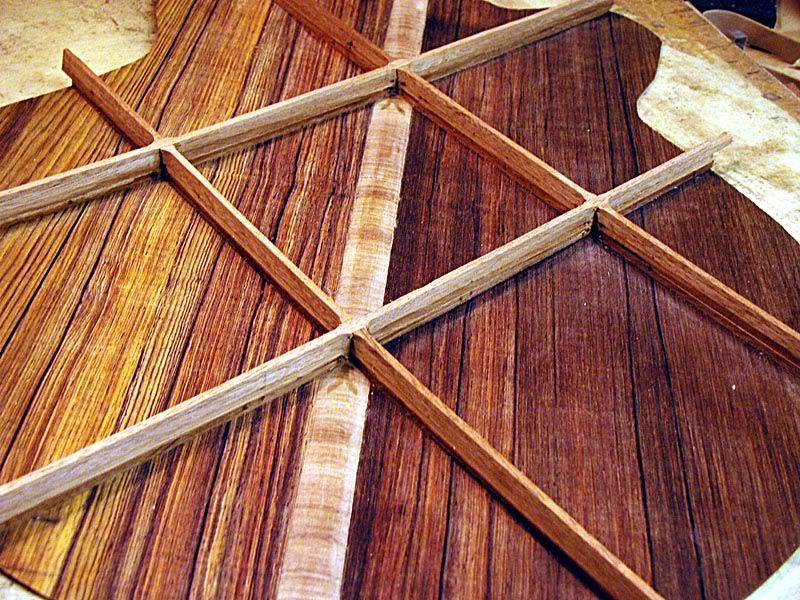
Here is the layout for the first layer:
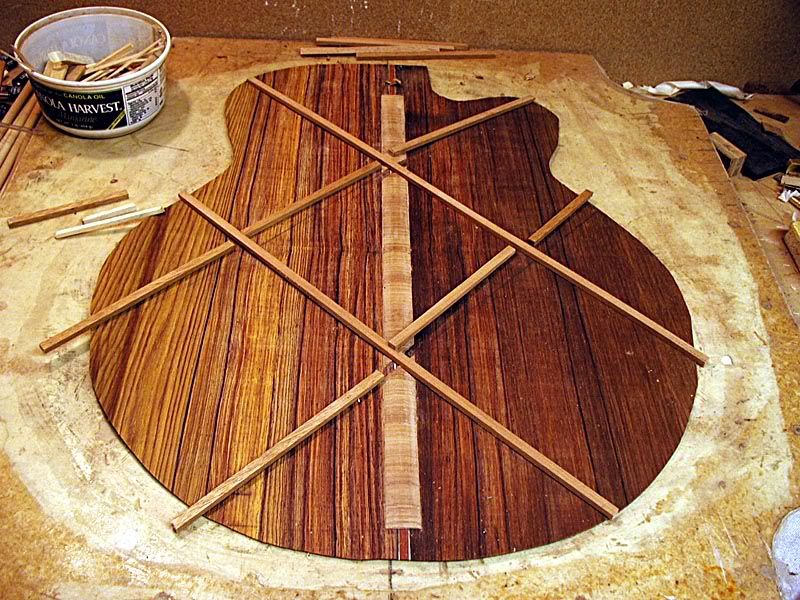
Alternating layers cross the opposite ways at the "X's", so the joins interlock. This is glued up in my radius dish mold.
Here it is starting the glueup:
The central part is 6" square on the outside. On smaller bodied guitars I use 5 1/2".
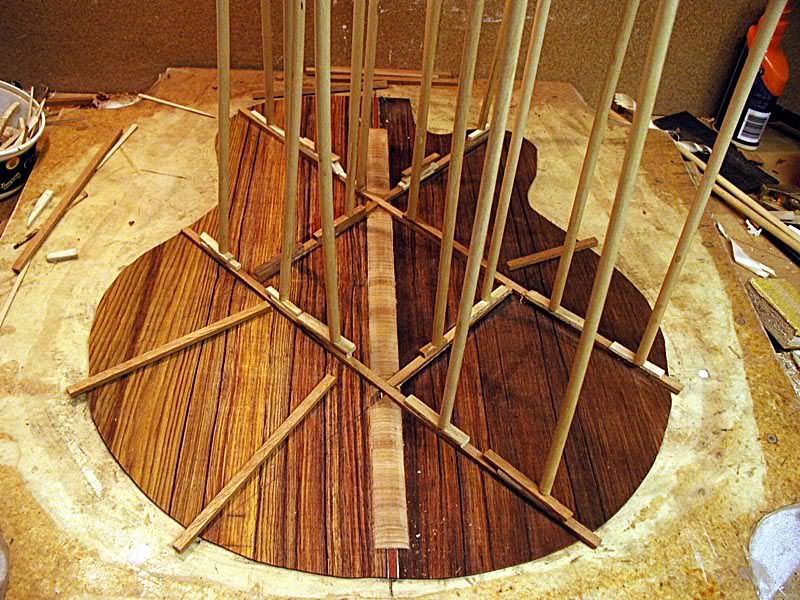
After a few more layers:
I use 3 layers of the 5/32" thick strips.
The fourth layer is a 1/16" thick strip to cap off the x's
This gets everything level and ties everything together.
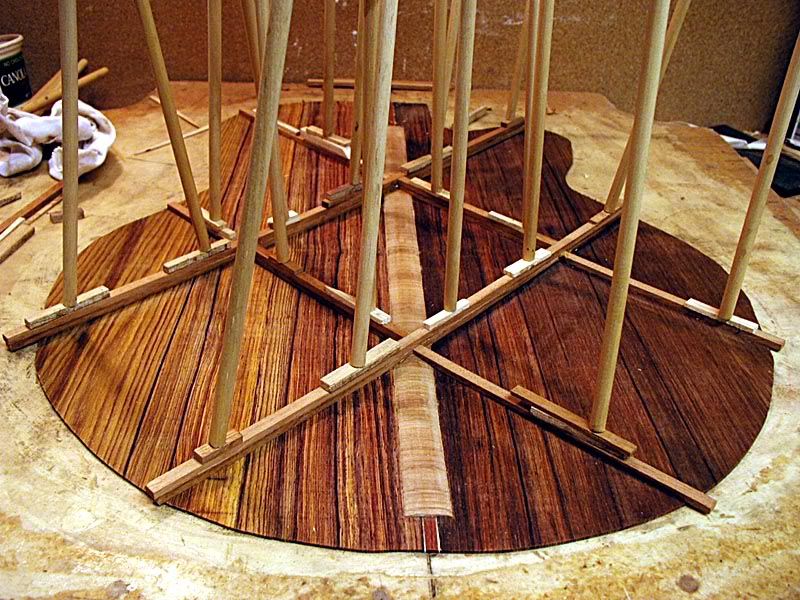
Here it is all glued up:

At this point it is pretty massive.
Next, I will go over it with a specially ground router bit to taper the sides of the braces.
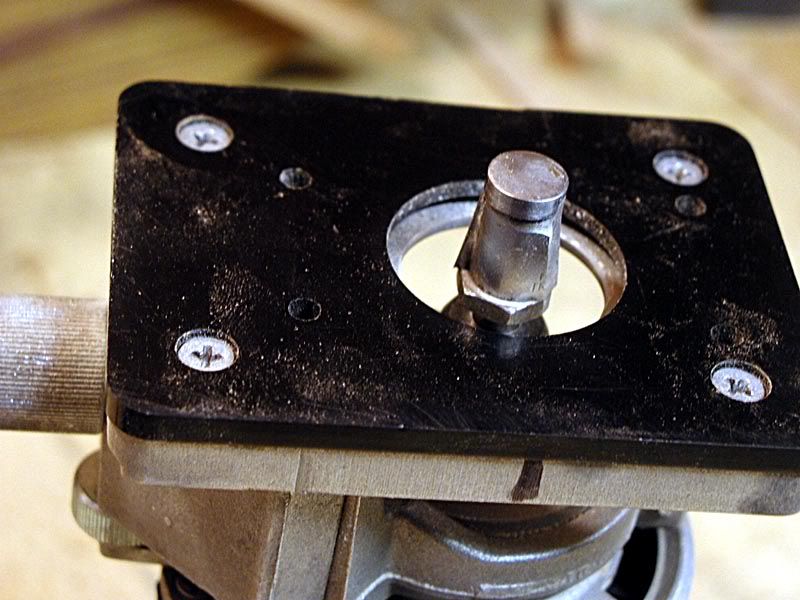
I ground this bit down from an old Craftsman bit, and cut the pilot to a shallow depth so it just rides on the bottom layer strip.
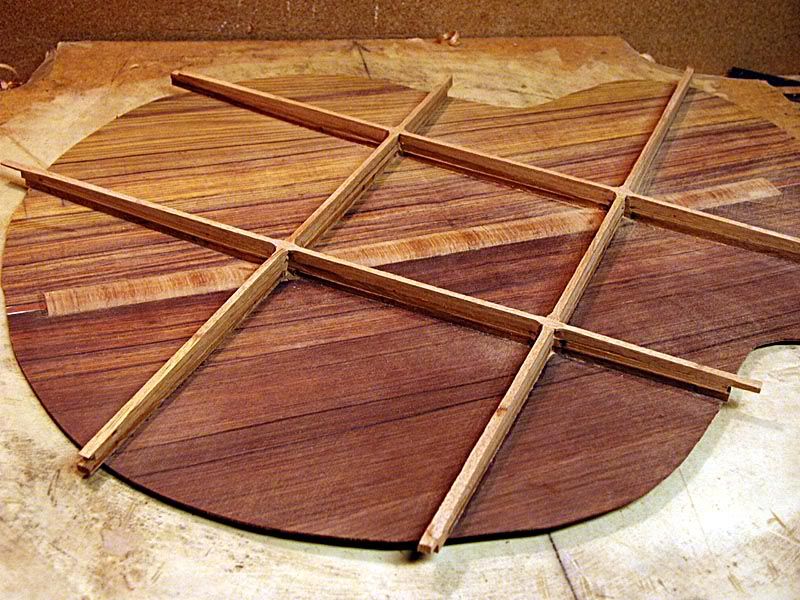
Here it is after routing:
This is just the first step in shaping the cross section of the braces. It is rough at this point, but a lot of wood has been removed.
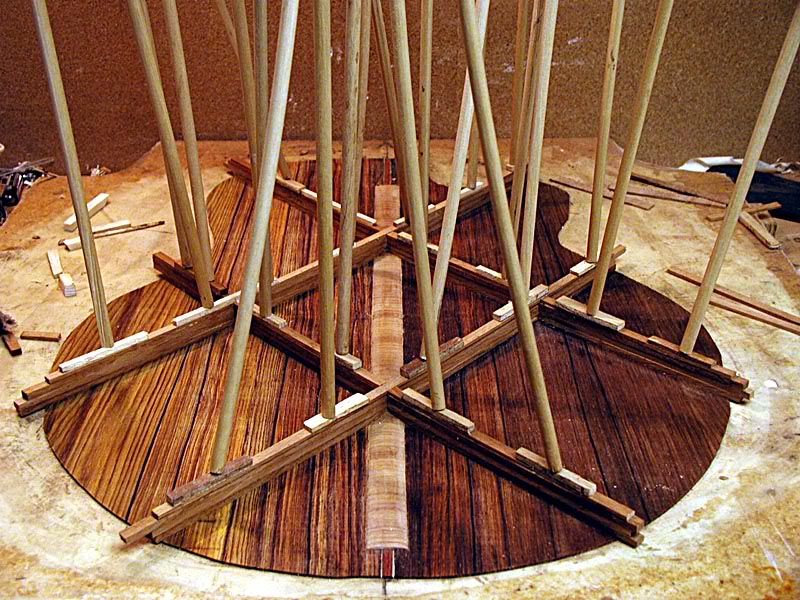
You can see that the full height laminated braces follow the curve of the dish mold:
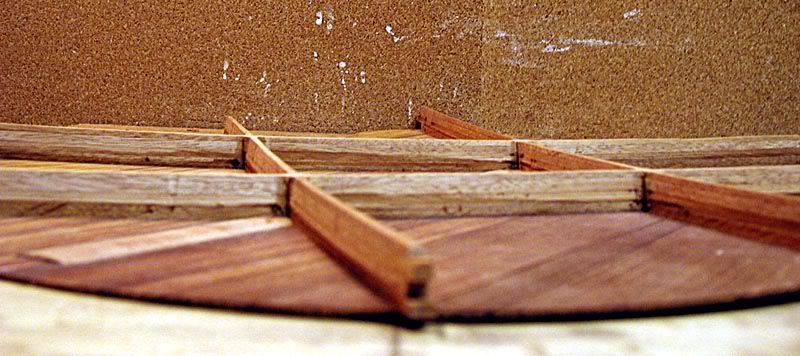
I will use a block plane and a sanding board to make the tops of the braces level.
Here it is after that step:
This tapers the braces a bit.
Another view:
These two steps have removed about 25% of the brace mass. Next, I will be using small planes to further taper the ends of the braces and clean up the brace sides. Then everything will be rounded over and sanded smooth. I will be doing that tomorrow.
I really like the result of this bracing. The back shape ends up very uniform and sturdy. It is a bit more time consuming than traditional ladder style bracing, so it is not a good "production" alternative. I do feel that an added benefit is that it will better allow the back to expand and contract with moisture changes without cracking.
G
On my last 3 guitars, I have been using a double "X" back bracing laminated out of layers of strips. The strips are 3/16" wide by 5/32" thick.
Here is the layout for the first layer:
Alternating layers cross the opposite ways at the "X's", so the joins interlock. This is glued up in my radius dish mold.
Here it is starting the glueup:
The central part is 6" square on the outside. On smaller bodied guitars I use 5 1/2".
After a few more layers:
I use 3 layers of the 5/32" thick strips.
The fourth layer is a 1/16" thick strip to cap off the x's
This gets everything level and ties everything together.
Here it is all glued up:
At this point it is pretty massive.
Next, I will go over it with a specially ground router bit to taper the sides of the braces.
I ground this bit down from an old Craftsman bit, and cut the pilot to a shallow depth so it just rides on the bottom layer strip.
Here it is after routing:
This is just the first step in shaping the cross section of the braces. It is rough at this point, but a lot of wood has been removed.
You can see that the full height laminated braces follow the curve of the dish mold:
I will use a block plane and a sanding board to make the tops of the braces level.
Here it is after that step:
This tapers the braces a bit.
Another view:
These two steps have removed about 25% of the brace mass. Next, I will be using small planes to further taper the ends of the braces and clean up the brace sides. Then everything will be rounded over and sanded smooth. I will be doing that tomorrow.
I really like the result of this bracing. The back shape ends up very uniform and sturdy. It is a bit more time consuming than traditional ladder style bracing, so it is not a good "production" alternative. I do feel that an added benefit is that it will better allow the back to expand and contract with moisture changes without cracking.
G
-
Dave Livermore
- Posts: 656
- Joined: Mon Dec 08, 2008 6:08 pm
- Include Off Topic: Yes
- Contact:
Re: New Cocobolo Jumbo
What a really cool idea on the back bracing.
Why didn't I think of that. Use the dish, laminate the braces and they stay in the radius after the glue dries.
Way cool!
Is that original or is it a trick I haven't read about in the journals of greatness yet?
Dave Livermore
Lindstrom, MN
Why didn't I think of that. Use the dish, laminate the braces and they stay in the radius after the glue dries.
Way cool!
Is that original or is it a trick I haven't read about in the journals of greatness yet?
Dave Livermore
Lindstrom, MN
there's no such thing as a ten minute project
-
whitespruce
- Site Admin
- Posts: 4367
- Joined: Thu Aug 21, 2008 6:53 am
- Include Off Topic: Yes
- Location: Northern Minnesota, USA
Re: New Cocobolo Jumbo
Welcome to the Community, Dave.Dave Livermore wrote:What a really cool idea on the back bracing.
Why didn't I think of that. Use the dish, laminate the braces and they stay in the radius after the glue dries.
Way cool!
Is that original or is it a trick I haven't read about in the journals of greatness yet?
Dave Livermore
Lindstrom, MN
I recall somebody mentioning the idea, but I don't remember where or when. But I just went from there and started doing it. I also do this on my top bracing.
It is a bit more fussy to do, but since I am here more for the journey than the destination, i enjly doing it. And on the top, it allows me to reduce the brace mass by at least a third.
G
-
Chris Muse
- Posts: 313
- Joined: Sat Aug 23, 2008 7:05 pm
Re: New Cocobolo Jumbo
Awsome Grant
Just keep giving me ideas. I might actually be able to use about a third of them before I go. Purdy wood, I am not worthy.
Chris Muse
Just keep giving me ideas. I might actually be able to use about a third of them before I go. Purdy wood, I am not worthy.
Chris Muse
-
Dave Livermore
- Posts: 656
- Joined: Mon Dec 08, 2008 6:08 pm
- Include Off Topic: Yes
- Contact:
Re: New Cocobolo Jumbo
If I think about this long enough I think I'll get why you reduce the brace mass.It is a bit more fussy to do, but since I am here more for the journey than the destination, i enjly doing it. And on the top, it allows me to reduce the brace mass by at least a third.
It's not because you're not carving the radius in
Is it because the glued up strip are stronger than a piece of wood that isn't glued up even though you're not running the grain of the strips in opposite directions?
This is an intriguing concept and something I'm going to have to explore.
Dave
there's no such thing as a ten minute project
-
ChuckH

- Posts: 112
- Joined: Mon Dec 01, 2008 1:07 pm
- Include Off Topic: Yes
- Location: Ft. Benning, GA.
- Contact:
Re: New Cocobolo Jumbo
Dude, I like that idea grinding a router bit down. What did you use to grind it. A grinder?.... 
Okay, okay, how did you keep it sharp?
Okay, okay, how did you keep it sharp?
SFC Chuck Hutchison
Ft. Benning, GA.
Ft. Benning, GA.