Small Concert, SC, Prototype BRW/ Itialian

Guitars by Todd Lunneborg of Andover, MN
User avatar
tlguitars
Posts: 333
Joined: Tue Sep 02, 2008 11:57 am
Include Off Topic: Yes
Location: Andover Minnesota
Contact:

Small Concert, SC, Prototype BRW/ Itialian

Post by tlguitars » Wed Oct 08, 2008 11:02 am

So I've been asked to build a parlor/OO guitar. I decided to take the challenge and build my own prototype, SC (Small Concert), which as I found out is the exact same thing my pal Brian Ap is doing-- as well as designing a hollowbody prototype, like I am also doing too. We're way too similar in thinking, and in life.

Here's my design and build prototype process. I love comparison design. I trace and layout the patterns off all the guitars in genre that I like or think that I might want to have compliment the shape (thanks to my apprentices who went to school for building here in MN and have all the shape templates you could think of). I chose a Parlor, a Martin OO, The Olson SJ, and the Martin OM. It was really interesting to see that the OM was bigger then the SJ. Well basically they're the same shape. Here's a photo of that. The Blue is the OM, the SJ is in Pencil, the Green is the OO and the Red is the Parlor.

Image

The next thing I'll do is start to pencil in points and lines where the shapes overlap and have similar movement that I may like and start to draw in what I like. I also will use my shape templates and change their angle to see if I like the results. The orange shape is what I came up with. It's the SJ/OM but minus about 1.5 inches from the center. So it's not as small as the parlor, but the interior of the upper bout still fits inside the OO upper bout. And the lower mimics the SJ/OM that is the reason I build.

Image

So here's the final shape.
Image

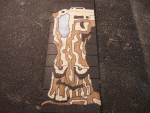
Now to pick the wood. I have a bunch of backs and sides that are ready to go and a bunch of throw away tops that my pal has sold me. They're just his rosette experiments that he wasn't happy with so I get them cheap. I'm using an Italian Spruce top that has the rosette design that I designed for my pal already inlayed. I'll insert my version of that process later. And a Brazilian Rosewood back and side that I got that has some back wing additions that the seller said he'd never build with. So while it might be master grade stuff all of my material for this build is stuff that better builders have said they didn't want.

Hurray for cast offs!! Here's the top size/ perspective shot.

Image

And the back perspective check and closer to see the perfectly quartered grain.

Image
Image

That's what I have to start.
Last edited by tlguitars on Tue Jun 23, 2009 10:18 pm, edited 3 times in total.

User avatar
Joe Sustaire
Moderator
Posts: 2640
Joined: Sat Aug 23, 2008 6:41 pm
Include Off Topic: Yes
Location: Talihina, Oklahoma

Re: Small Concert, SC, Prototype BRW/ Itialian

Post by Joe Sustaire » Wed Oct 08, 2008 1:35 pm

Hey Todd, thanks for showing your design process. That's some good info on tweaking shapes you like into something a little more personal.

And looking at the "cast-off" material your building with, I definitely need to get a better class of buddies. :D

Any high end builders out there looking for a new buddy? :lol:

Joe
"I tell you we are here on earth to fart around, and don't let anyone tell you any different!"
Kurt Vonnegut

User avatar
tlguitars
Posts: 333
Joined: Tue Sep 02, 2008 11:57 am
Include Off Topic: Yes
Location: Andover Minnesota
Contact:

Re: Small Concert, SC, Prototype BRW/ Itialian

Post by tlguitars » Wed Dec 03, 2008 8:12 pm

It's been a awhile since I've built. Been writing 2 new FBJ articles... wait and see, they're killer!!!

Anyway, back to the cool stuff. Template making. 1/4 Plexi bought at the depot by the screen doors. I cut out a copy of my original drawing/ design and tape and marker transfer it onto my plexi. Then I cut, sand, file, and sand until it's smoothe.


Trace and transfer:
Image
Image
Image

Cut and shape, sand, file and sand with 220.
Image
Image
Image
Image
Image
Image

And now I can transfer my final shape. I'm nothing if not visual. I thought I'd added more pics to the computer. I'll post more later.
Image
Last edited by tlguitars on Tue Jun 23, 2009 10:19 pm, edited 1 time in total.

User avatar
Eben
Chairman Emeritus
Posts: 6150
Joined: Thu Aug 21, 2008 9:58 am
Include Off Topic: Yes
Location: Lummi Bay, WA
Contact:

Re: Small Concert, SC, Prototype BRW/ Itialian

Post by Eben » Thu Dec 04, 2008 9:03 am

Good to have you back and building, Todd.

E
‘I love America - I just dont know how to get there anymore.’

John Prine

UrbanMonique Food Blog

User avatar
Dennis Leahy
Dishwasher
Posts: 7082
Joined: Thu Aug 21, 2008 1:59 am
Include Off Topic: Yes
Location: looking for a place to live

Re: Small Concert, SC, Prototype BRW/ Itialian

Post by Dennis Leahy » Fri Dec 05, 2008 8:49 am

Todd,

Thanks for showing your process for making templates, and for the pre-planning that went into the layout.

It's amazing that these particular parts were rejected by another luthier. I have a strong suspicion that this guitar will be treasured by its owner, and the concept of "reject" anything will never enter their consciousness.

You'll have to do a tutorial on that rosette style (the faux crossover purflings around the abalone), it looks very classy!

Dennis
Dennis Leahy

User avatar
tlguitars
Posts: 333
Joined: Tue Sep 02, 2008 11:57 am
Include Off Topic: Yes
Location: Andover Minnesota
Contact:

Re: Small Concert, SC, Prototype BRW/ Itialian

Post by tlguitars » Thu Jan 01, 2009 2:27 pm

So I've got the new jigs to the 2/3rds done point. Just the tops and the inserts left. I build these molds this way so I don't have to use a radius dish or a side cut jig. It's all built into 2 forms so that I'll always have, and that will be 100% all the time (fingers crossed). So to the molds: When we last left our hero...

Had just completed the plexi SC shape. Hurray for step 10 out of 110!!! I then routed and glued in my back lines. I'm using reject flame Koa binding that I got as large side scraps and cut binding out for myself I'm low on w/b/w binding and I'm planning to add a top purfling of Cocobolo to match the core of the rosette so I'm using w/b/w/b binding That I'm going to roll a little thinner. But here's the back.

I find center and mark and test my straight edge and my router until I line up center. Then I route my channel. After the channel is in I clean the dust and preset the lines, sand the edge with 120 grit until everything fits and then I glue with CA. Spray with quick cure and then take the whole back down to final thickness with my thickness sander. I'm not much for scraping here. I sand the top of the back until everything's even then flip it to get to my final back thickness. Flex for taste, but it's usually around say .104-.109ish. Then I cut it to shape.

Image
Image
Image
Image
Image
Image
Image

Now to the molds. Off to the "Depot" to get 2 sheets of cabinet grade (17 lam ?) 3/4 ply and another sheet of 1/4 plexi. I have the ply cut to 19" so they'll fit in the Saab and I can get to work.

Image

So my next step is to make the fit-ring template from my plexi. It's basically just the reverse of my first plexi body shape with a 2" splash guard. So I transfer my shape to the plastic and measure out 2". I like to use the 3 to 1 measure lines because they're actually lines that I can check, rather then just the end of my ruler. I'll measure 2" at about 56 points around the shape to mar the splash guard. Then it's the french curves and I connect the dots.

Image
Image
Image
Image
Image

So the layout is done and now I band saw the waste from the edges and drill a hole and jig saw out the center. I'll then sand to shape with my Osil. and Edge sanders. Once that's done I hand file and sand to puzzle piece the two templates together. It's slow but to be honest it's some of the most satisfying work I get to do as builder. The trick is to check your shape to the 1st plexi templae using tracing paper. That way you can check your shape progression with out have to try and fit test all the time. That's hard because the 2 pieces will flex to fit rather than just fit. I use different colored pencils and just trace a new shape with a new color. This'll get you 98% of the way there and you won't have to flex yourself to death.

Image
Image
Image
Image
Image
Image
Image

User avatar
tlguitars
Posts: 333
Joined: Tue Sep 02, 2008 11:57 am
Include Off Topic: Yes
Location: Andover Minnesota
Contact:

Re: Small Concert, SC, Prototype BRW/ Itialian

Post by tlguitars » Thu Jan 01, 2009 2:55 pm

So now to start making the molds. I cut the 19" X 48" down to 24". I can then screw on my plexi splash guard template and route the ply to shape. I then will trace and bandsaw off the bulk ply so I can finish all the outside shaping at my router table, I only use the plexi shape on the 1st form. After that first one is done I use the ply to shape everything. The plexi can burn through if you don't keep your guide bearing lubed.

Image
Image
Image
Image
Image
Image

After picking 2 flats out to be my bottoms I then trace the inside of my plexi pattern onto what will now become a ring. I center punch two 3/8" locating holes at the top and bottom of the rings. These 2 holes make alignment in the next step a cinch. I'll drill and jig out the bulk inside of the ring and take to final shape at the router table. Again using the plexi only on the 1st ring and then I'll use the ply ring as my template for the rest.

Image
Image
Image
Image
Image

After all that's done it's time to assemble the molds. So start at the bottom and build up using 3/8" dowels to locate the rings. After my first ring I mark with arrows the locations of my 1 1/4" screws. I also mark the location of the second holes that way I won't hit screw heads as I continue up. I'm constantly rsetting and emoving my locater dowels and I made a quick tool to help remove them by sanding the tip of a hand drive 16 (penny nail). I place the head on the dowel and hit the sanded tip. After all the rings are built up I drive the dowels all the way through and sand the inside and outside of the molds. The last step, for now, is I route the back with a 1/2" round over bit.

Image
Image
Image
Image
Image
Image

User avatar
tlguitars
Posts: 333
Joined: Tue Sep 02, 2008 11:57 am
Include Off Topic: Yes
Location: Andover Minnesota
Contact:

Re: Small Concert, SC, Prototype BRW/ Itialian

Post by tlguitars » Sun Jan 11, 2009 8:07 pm

Have built most of the side bending mold. I now have to rebuild my side bender because I bought some old KR side slats that are too wide for my machine. Such is life I guess. So I traced the side profile onto the ply and then marked 1/8 under the line all the way around. I also pulled in the waist 1/4 of an inch so I can over bend just enough so my spring back won't be to bad. I also sand in the outside ends where the sides meet the blocks to make it over bend there as well.

I drill the 3/8 hole for my dowel locators and cut an sand the the side shape to size. I'll then pre-cut and route the rest of my sides to match as well as drill the holes through so it'll all line up in assembly. Then I hammer in the dowels and screw it all together with 1 1/4" screws. The last step is to sand it all smoothe, which isn't done yet. Sunday shut down time got me before I could finish.

Image
Image
Image
Image
Image
Image

Post Reply