Page 8 of 14

Re: A Pair of Ditsons

Posted: Fri Oct 10, 2008 9:40 pm
by Joe Sustaire
Hey Chris, thanks for the nice comments. I'm pretty much a newbie also, these two are builds 5 and 6 for me, with the first one a 000 kit from stew-mac. So I'm pretty much soaking up as much as I can from those that know.

On that tutorial Hesh uses a single-flute countersink from Woodcraft like these,

http://luthiersforum.3element.com/forum ... 154big.jpg" onclick="window.open(this.href);return false;

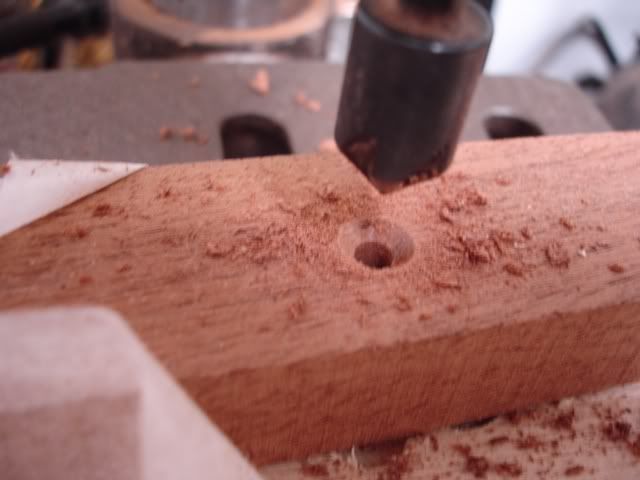
I don't have one yet, and the old standard type countersink I had did a pretty lousy job, not really nice and round. So someone else in the comments on that page of Hesh's tut. said they had had good luck using a cone shaped grinding stone. So I found one of those from one of those cheap sets of assorted stones in my junk drawer, and while not perfect, it sure did a better job than the old type countersink. I'm definitely going to get one of the single flute types though. They appear to do a great job.

Joe

Re: A Pair of Ditsons

Posted: Fri Oct 10, 2008 10:38 pm
by Ron
Nice Job on the bridges I like them. I have to show you a drill tool that I used too for making bridges, ya more tools...
I try to remember monday if I have time. I think it call a bridge plate saver and a taper bit...wait to I show you how I used them.
:P well also nice neck guess you read WC book....

Ron

Re: A Pair of Ditsons

Posted: Fri Oct 10, 2008 11:33 pm
by Dennis Leahy
Very cool, Joe! I like all the bridges, but I especially like the personality of your hybrid pyramid bridges. Well done!

Love that action shot of carving the neck, too!

Dennis

Re: A Pair of Ditsons

Posted: Sat Oct 11, 2008 1:18 am
by Lefty
Joe,

Holy Cow Man. Your on fire. Nice job on the bridges. All of them.

Lefty

Re: A Pair of Ditsons

Posted: Mon Oct 13, 2008 6:11 pm
by Ron
Image

I was telling you about making custom bridges with out the blueprint glue on the wood...
well I found a way the I used without the drill moving on me and keeping the holes all line up
I use a bridge plate and tape them to the bridge..
Image
you can pretty much making up what ever you want as far as shape here..
then I was saying about about the taper tool
Image
I pick them up at sears
Image
I had to show you this because it tappers the hole so nice check out how nice the pin
fit into the hole.
Image

well just wanted to show you joe

to tapper the inside of the hole I use a bridge pin tapper tool I get from grizzly...under the luthier page.Ill get a photo ,I ran out of time today and had to go pick up the kids from school.


ron

Re: A Pair of Ditsons

Posted: Mon Oct 13, 2008 6:50 pm
by Joe Sustaire
I appreciate you following this guys, and particularly the kind comments!

Hey thanks Ron, that's some more good info. I need all I can get. :D

So I glued some walnut and rosewood onto headstock for each guitar.

Image

Image

I always enjoy shots with clamps sticking out everywhere. Makes you feel like your really accomplishing something. :D


So here's how I make my slotted headstocks. First I layout my tuners to mark the position I need to drill for the pegs. And it's important to remember to drill those before you cut your slots. That keeps it clean, otherwise there is a chance of splintering as the drill hits the slots.

Image

I use a cheap doweling jig, but it works good. You just have to lay out your center lines and move it for each peg.

Image

This shows some of my layout lines and 1/2" holes drilled at the ends of the slots.


Image

Now I mark my cut lines with white pencil for visibility.


Image

Clamp the neck in the vise, note the spacer inserted into the trussrod slot so that I don't crack the neck.


Image

Image

And I use a blade that cuts on the downstroke which makes for a pretty clean cut with little tear-out. I carefully cut just inside the line.


Image

Image

Then clean up the slots with some stick-on sandpaper on a stick. I found that the second position really helps to keep my sanding flat, right at eye level.


Image

And the slots look pretty clean.


So now I cut my string ramps with a rat-tail file, finishing with some sandpaper on a 1/2" dowel.

Image

Image

And I've always had trouble with the tail end of my file gouging the slots as I was carefully focused on cutting the ramps. So this time I cut some shields out of aluminum flashing, bent them into an L shape and stuck them in the slots with double back tape. So for the first time I didn't bugger up my carefully made slots.


Image

And there you have it. Two slotted headstocks.
All for now,
Joe

Re: A Pair of Ditsons

Posted: Mon Oct 13, 2008 7:16 pm
by Garry Hallam
Nice work Joe, and some good creative solutions too. You sure make it look easy with all you do.

Garry

Re: A Pair of Ditsons

Posted: Mon Oct 13, 2008 10:03 pm
by Dennis Leahy
Hi Joe,

Very classy, and classic, headstocks! Nicely done! And, I will remember the aluminum flashing trick - good one.

Dennis