
E
Documenting my 1st thermally modified build, videos added, SOLD
-
Eben

- Chairman Emeritus
- Posts: 6150
- Joined: Thu Aug 21, 2008 9:58 am
- Include Off Topic: Yes
- Location: Lummi Bay, WA
- Contact:
Re: Documenting my first total thermally modified build
I'm likin' that top, G!

E
E
-
Dennis Leahy

- Dishwasher
- Posts: 7082
- Joined: Thu Aug 21, 2008 1:59 am
- Include Off Topic: Yes
- Location: looking for a place to live
Re: Documenting my first total thermally modified build
I got a chance to see the top in-progress yesterday. Just beautiful.
Dennis Leahy
-
charangohabsburg
- Posts: 354
- Joined: Tue Oct 19, 2010 6:16 pm
- Include Off Topic: Yes
- Location: Switzerland
Re: Documenting my first total thermally modified build
Why kidding? As you say the different colours that can be achieved by "baking" wood widens the palette considerably!printer2 wrote:Baked rosette? Just kidding, actually thought of doing some wood just to get different colors. Cherry turns a nice shade and really brings out the flame in Maple as we saw in the other thread. Looking forward to the bark rosette,
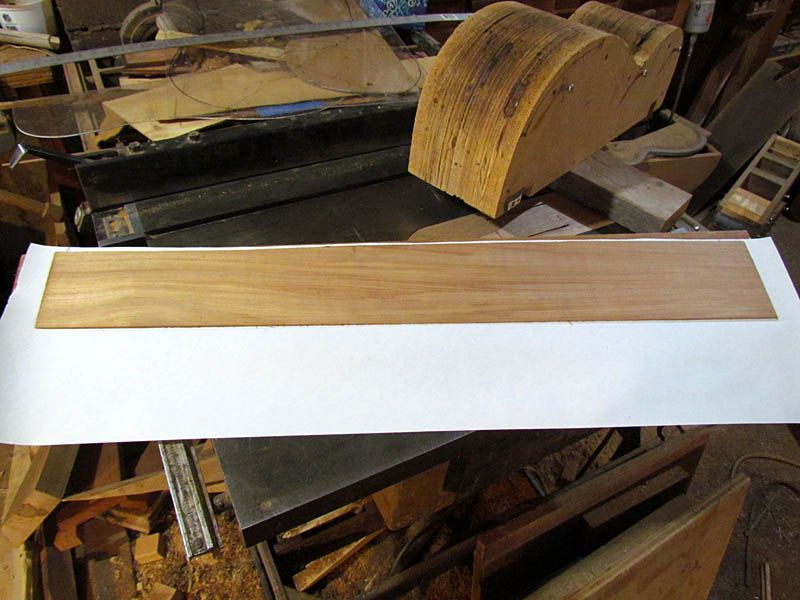
Great idea to use bark, it (well, at least yours) looks really good.whitespruce wrote:Moving on to the rosette. This will be a segmented ring of end grain white oak bark with an inner and outer b/w/b veneer line sequence.
Markus


-
whitespruce

- Site Admin
- Posts: 4367
- Joined: Thu Aug 21, 2008 6:53 am
- Include Off Topic: Yes
- Location: Northern Minnesota, USA
Re: Documenting my first total thermally modified build
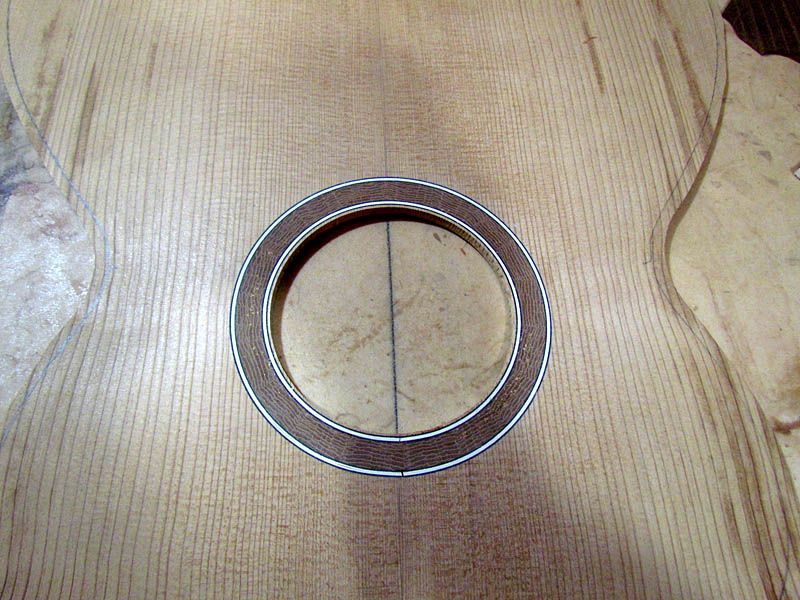
Just a few more steps to finish the rosette, then on to bending sides.
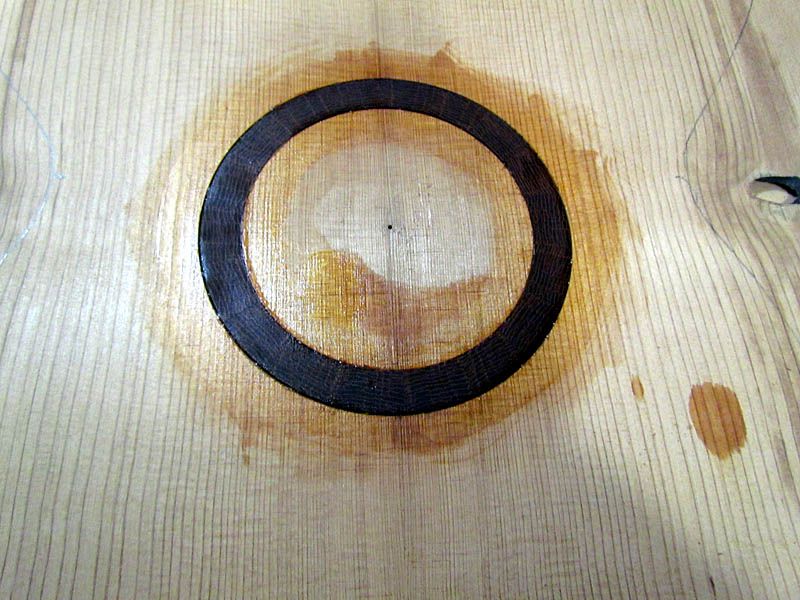
Ran it through the sander to get the bark almost level with the top
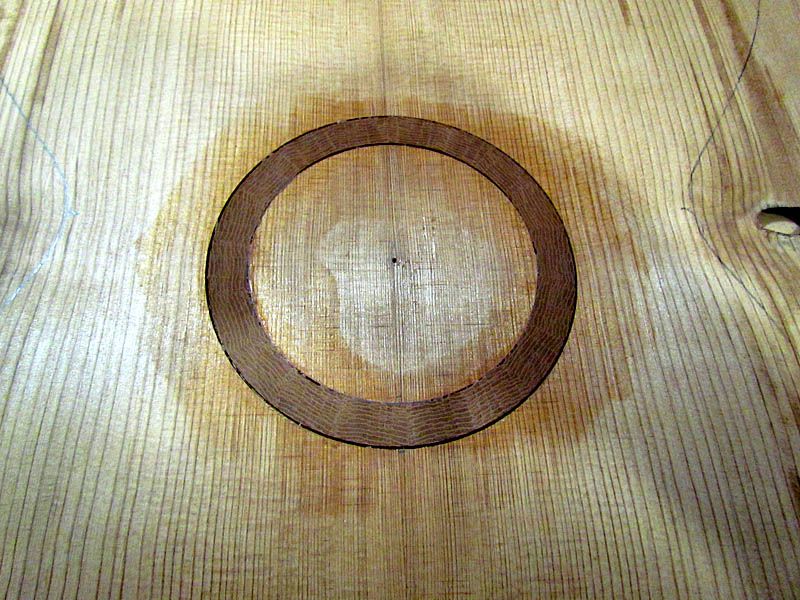
Then soaked in another coat of shellac
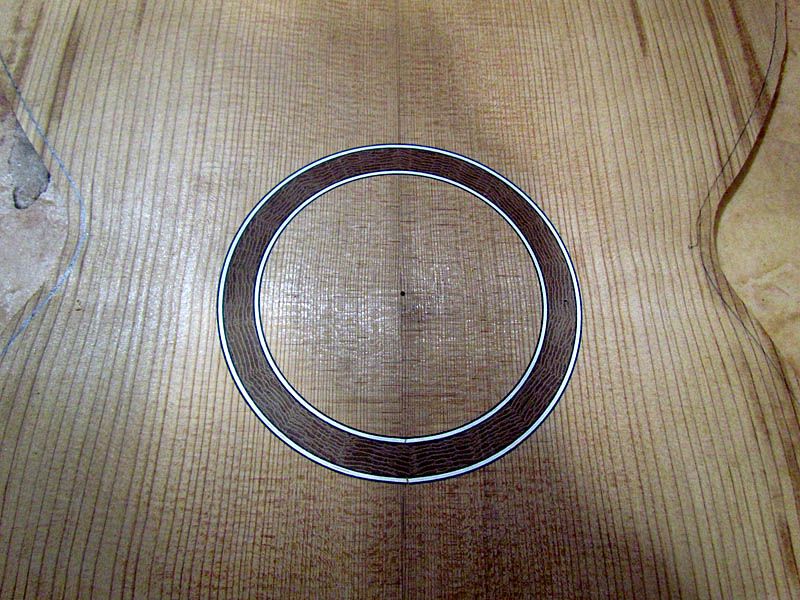
After routing 3/32" purfling channels inside and out, I put in B/WW/B veneer lines and soaked in thinned wood glue. Let it sit over night and then sanded everything flush
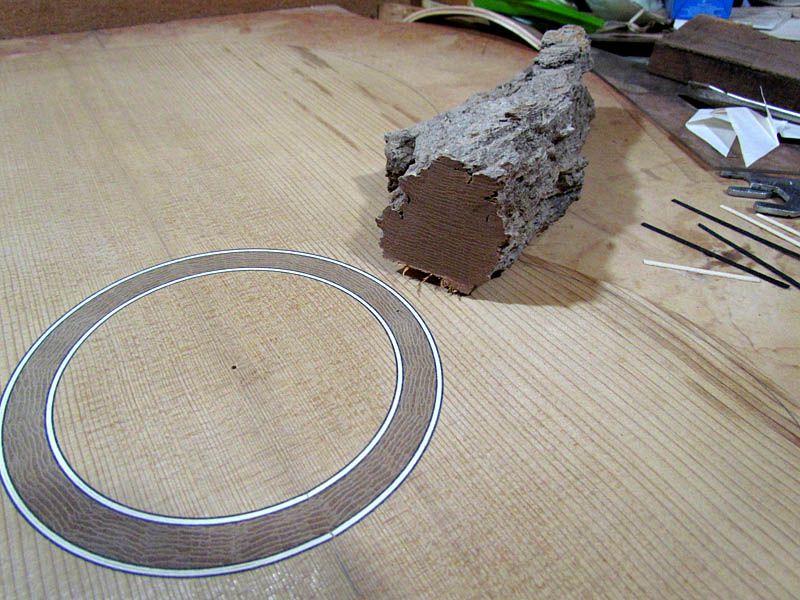
Here it is with a chunk of the oak bark used for the rosette center
Now on to the sides and then bracing the top.
G
Ran it through the sander to get the bark almost level with the top
Then soaked in another coat of shellac
After routing 3/32" purfling channels inside and out, I put in B/WW/B veneer lines and soaked in thinned wood glue. Let it sit over night and then sanded everything flush
Here it is with a chunk of the oak bark used for the rosette center
Now on to the sides and then bracing the top.
G
-
whitespruce
- Site Admin
- Posts: 4367
- Joined: Thu Aug 21, 2008 6:53 am
- Include Off Topic: Yes
- Location: Northern Minnesota, USA
Re: Documenting my first total thermally modified build
OK, as you recall, the back plates were thermally modified, but the sides were not. The reason for this is that thermally modified sides are very difficult to bend, thus, a workaround. The sides will be bent first, and then thermally modified. It is actually a very simple process.
The sides can be bent using whatever method/process works for you. The important part is that you get a good bend with no springback. The other thing is that you will need to end up with the bent sides wrapped in a layer of kraft, or similar paper, and then aluminum foil. I will show my process and you can adapt accordingly to your process.
I use a thermostatically controlled heating blanket and a bending form with cauls to clamp the sides. I usually set the temperature around 325 F. I have better luck bending if I dip or soak the sides in hot water for a few minutes on softer woods to up to a half hour with dense rosewood. Do what works for you...it will not matter.
So, after I have soaked one of the mahogany sides, I wrap in white Kraft paper (brown will work, too)
Then aluminum foil
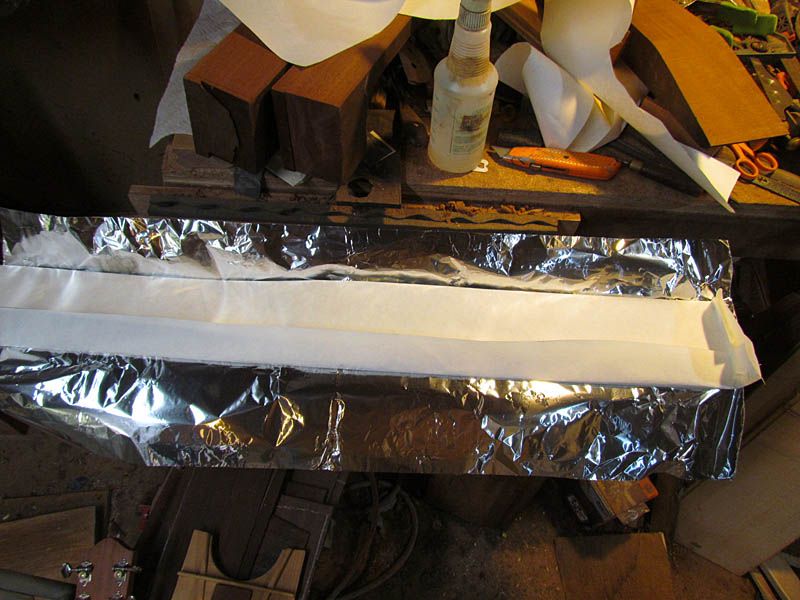
Here it is ready for the bender
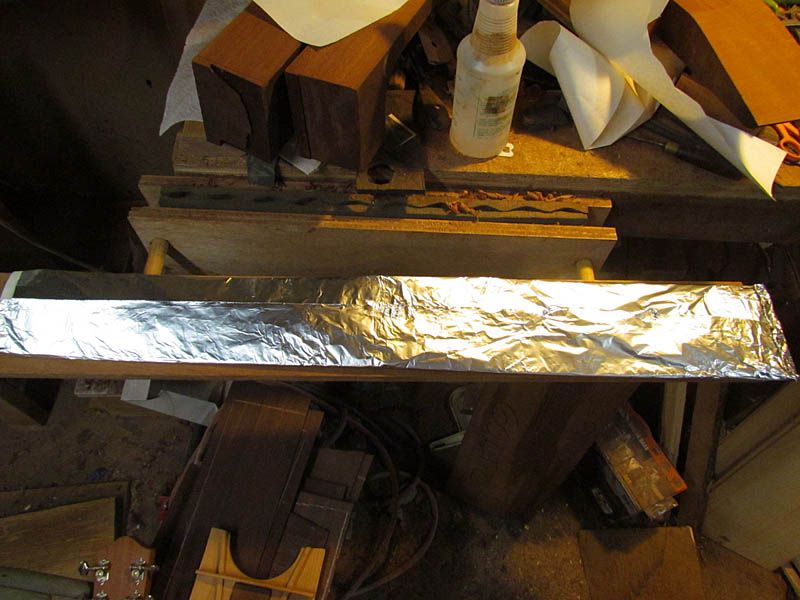
I did not photo the actual bending operation, like I said, do what works for you. I bend at 325 F and have found that a second heating cycle of 5 or 6 minutes at 350 F will totally set the bend and prevent springback.
Here are both sides, bent
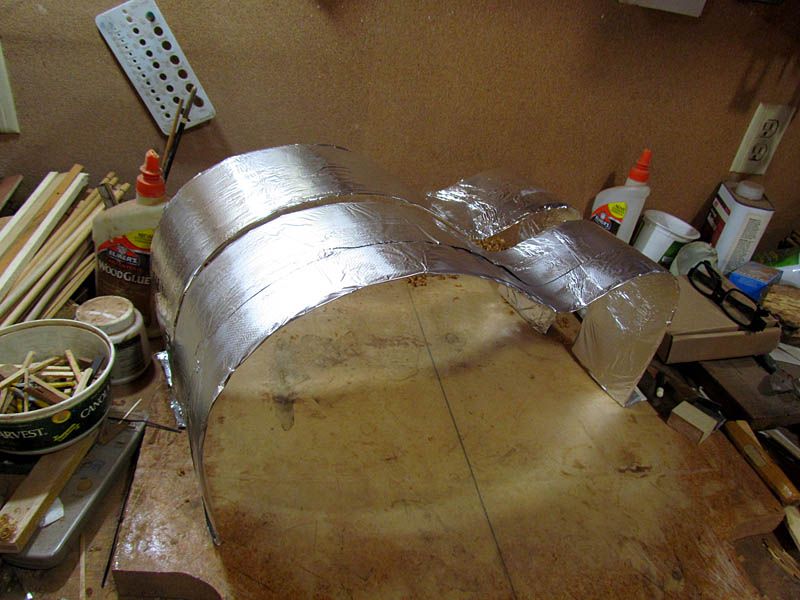
Notice, I have left them wrapped. Now, if you bend on a hot pipe or otherwise do not wrap sides for bending, just wrap them afterwards. Tip: fold the paper and aluminum foil down the center and insert the bent sides from the side like putting into an envelope.
So on to the kitchen oven. You will be cooking these at 380 F (way cooler than a pizza). Set the oven temperature and put in the sides. Then turn it on
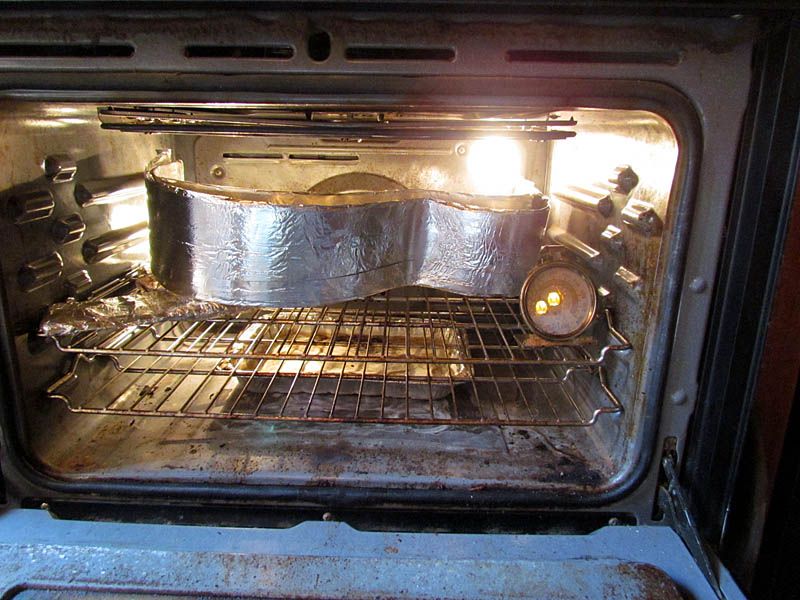
I don't trust the temp setting, so I also use an oven thermometer. (notice the aluminum foil wrapped packets under the sides...bracewood being cooked at the same time)
Once the temperature is up to the 380 F let the sides bake for 40 or 50 minutes. Then remove the sides, they are done. Keep in mind that although the Thermowood process goes for around 72 hours, the kiln is only at maximum temperature for an hour or so.
So here is a side done
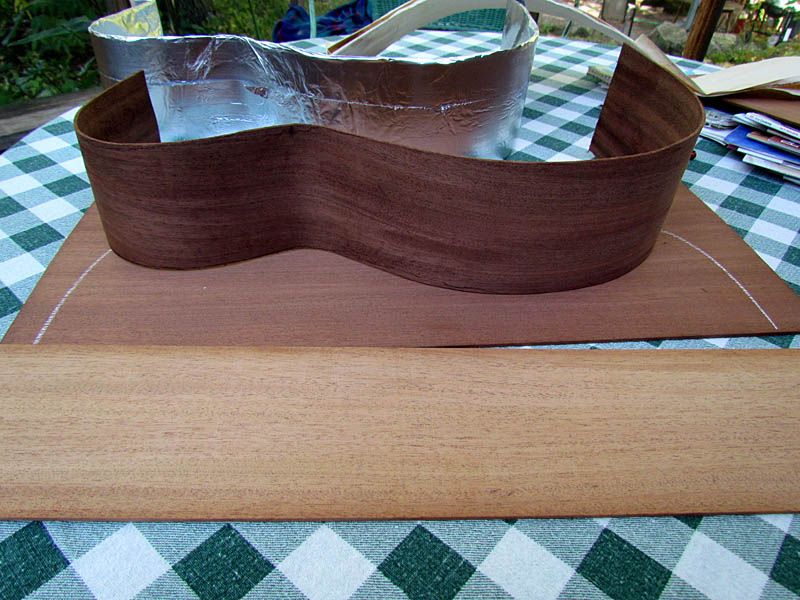
It looks darker than the treated back under it, but that is mostly the light angle plus a small amount of surface darkening that sands off. The piece in the foreground is an untreated side
Another photo
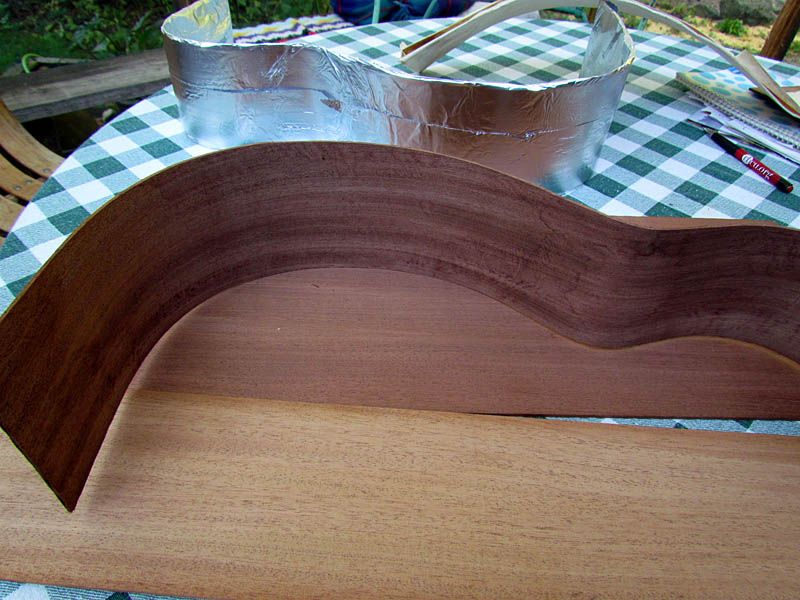
And with the second side, still wrapped in the Kraft paper

That is all there is to it. Questions/comments are welcome.
BTW, I will send a couple of pieces of the white Kraft paper along with the drawing prize.
G
The sides can be bent using whatever method/process works for you. The important part is that you get a good bend with no springback. The other thing is that you will need to end up with the bent sides wrapped in a layer of kraft, or similar paper, and then aluminum foil. I will show my process and you can adapt accordingly to your process.
I use a thermostatically controlled heating blanket and a bending form with cauls to clamp the sides. I usually set the temperature around 325 F. I have better luck bending if I dip or soak the sides in hot water for a few minutes on softer woods to up to a half hour with dense rosewood. Do what works for you...it will not matter.
So, after I have soaked one of the mahogany sides, I wrap in white Kraft paper (brown will work, too)
Then aluminum foil
Here it is ready for the bender
I did not photo the actual bending operation, like I said, do what works for you. I bend at 325 F and have found that a second heating cycle of 5 or 6 minutes at 350 F will totally set the bend and prevent springback.
Here are both sides, bent
Notice, I have left them wrapped. Now, if you bend on a hot pipe or otherwise do not wrap sides for bending, just wrap them afterwards. Tip: fold the paper and aluminum foil down the center and insert the bent sides from the side like putting into an envelope.
So on to the kitchen oven. You will be cooking these at 380 F (way cooler than a pizza). Set the oven temperature and put in the sides. Then turn it on
I don't trust the temp setting, so I also use an oven thermometer. (notice the aluminum foil wrapped packets under the sides...bracewood being cooked at the same time)
Once the temperature is up to the 380 F let the sides bake for 40 or 50 minutes. Then remove the sides, they are done. Keep in mind that although the Thermowood process goes for around 72 hours, the kiln is only at maximum temperature for an hour or so.
So here is a side done
It looks darker than the treated back under it, but that is mostly the light angle plus a small amount of surface darkening that sands off. The piece in the foreground is an untreated side
Another photo
And with the second side, still wrapped in the Kraft paper
That is all there is to it. Questions/comments are welcome.
BTW, I will send a couple of pieces of the white Kraft paper along with the drawing prize.
G
-
Joe Sustaire

- Moderator
- Posts: 2640
- Joined: Sat Aug 23, 2008 6:41 pm
- Include Off Topic: Yes
- Location: Talihina, Oklahoma
Re: Documenting my first total thermally modified build
All right! That rosette looks great on that top, very organic, and I love the wide grain on that toasty, 'er, tasty top.
Looks like home baking the sides is a pretty straightforward affair as well. Thanks for walking us thru the process!
Looks like home baking the sides is a pretty straightforward affair as well. Thanks for walking us thru the process!
"I tell you we are here on earth to fart around, and don't let anyone tell you any different!"
Kurt Vonnegut
Kurt Vonnegut
-
whitespruce
- Site Admin
- Posts: 4367
- Joined: Thu Aug 21, 2008 6:53 am
- Include Off Topic: Yes
- Location: Northern Minnesota, USA
Re: Documenting my first total thermally modified build
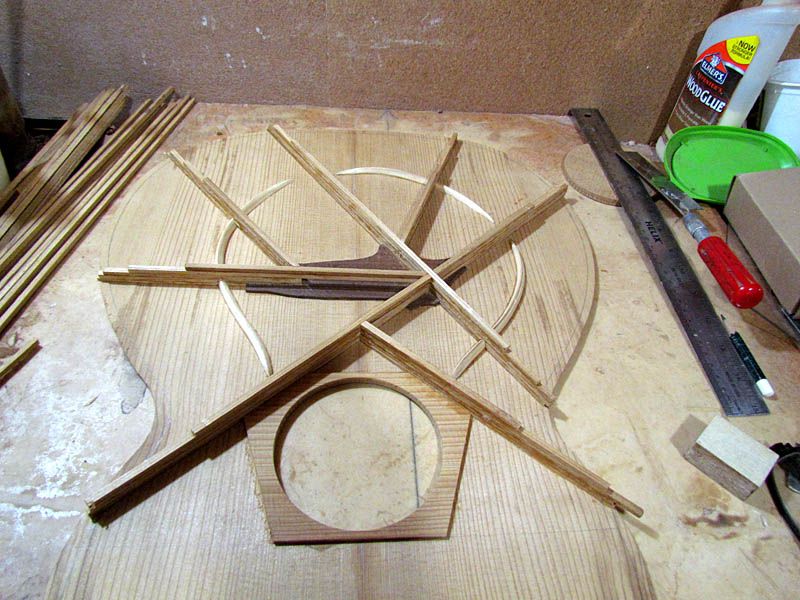
Bracing the Top
I have posted this process many times on other builds, but here it is again to show it can be done with thermally modified wood
I put an extra reinforcing patch around the soundhole, so that is the first step
Then I can cut the soundhole
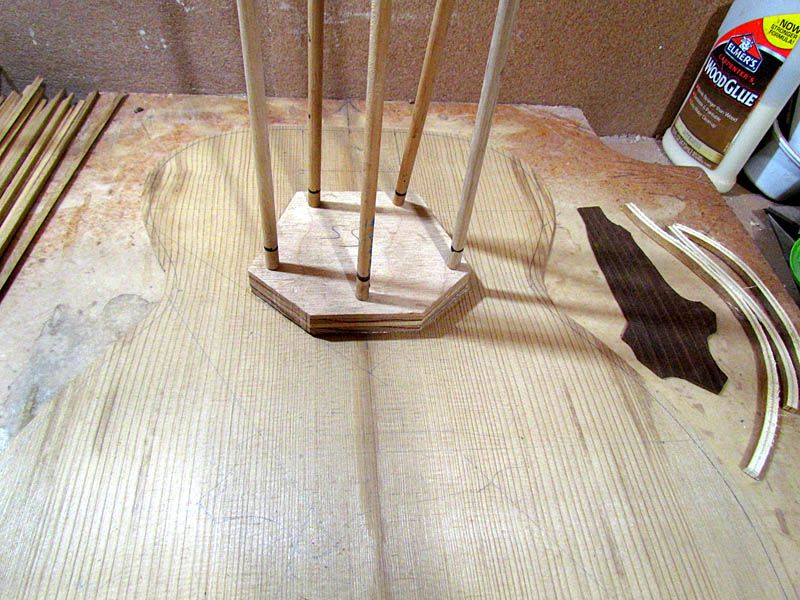
The first actual braces are the bridge plate (thermally modified Osage Orange) and my infamous curved braces
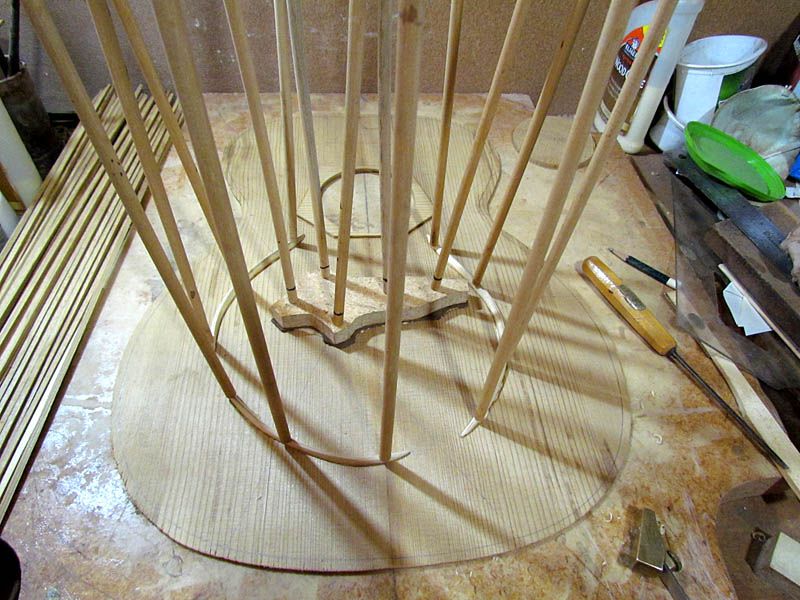
I start my laminated braces with a first layer the same height as the thickness of the bridge plate
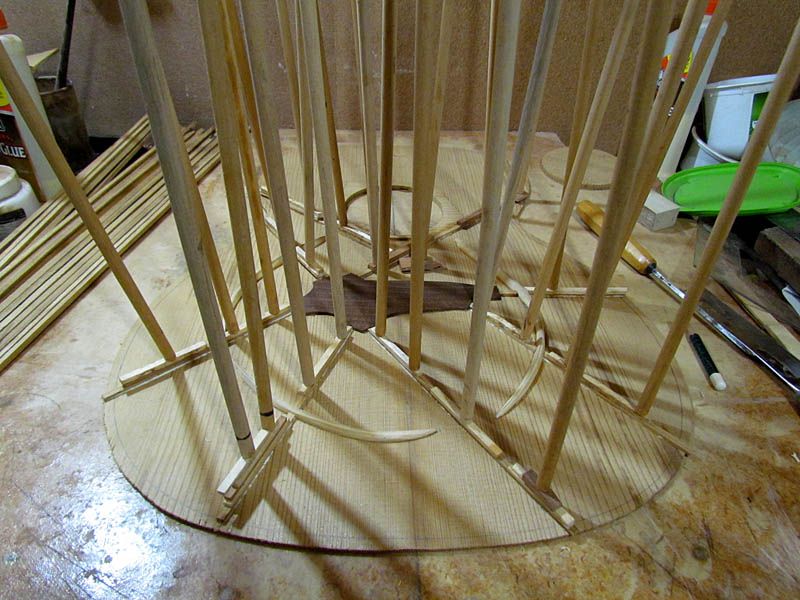
The rest of the laminations are a bit thicker
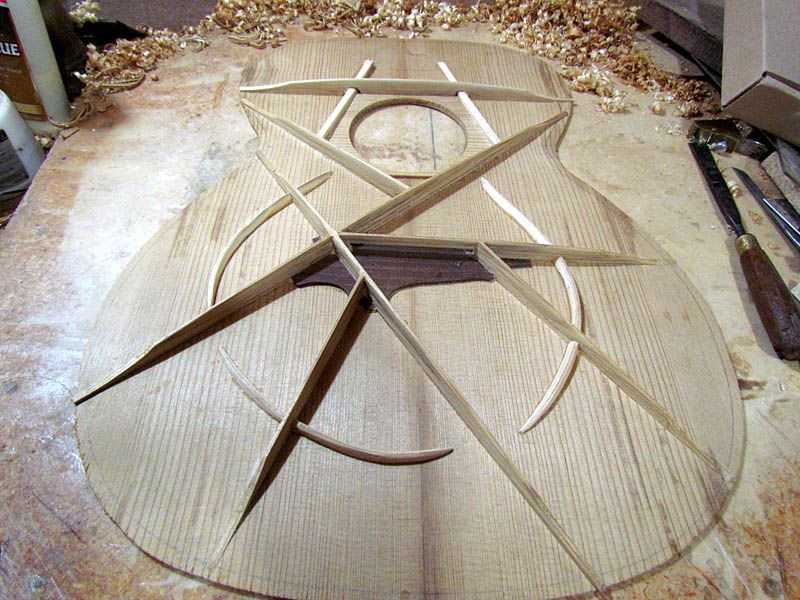
Here, all of the layers have been glued on
The next step is to plane the braces to final height
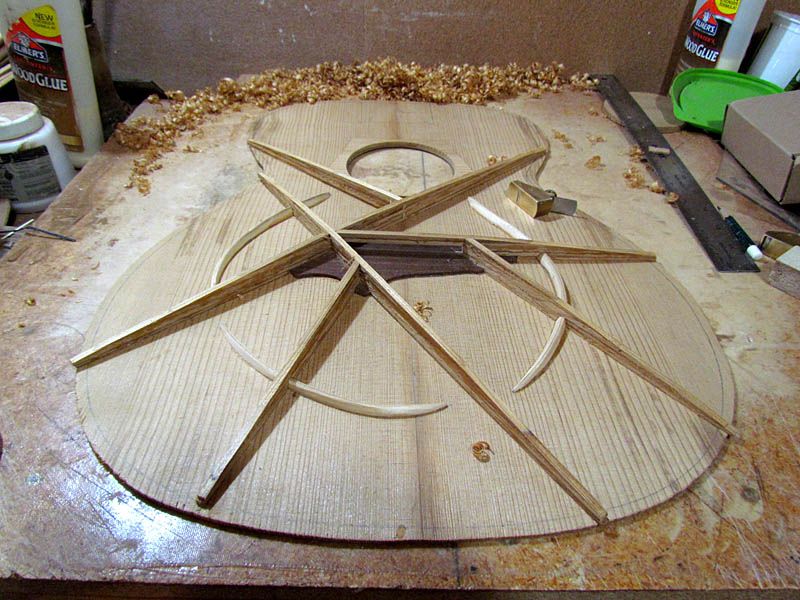
I give the braces a tapered cross section
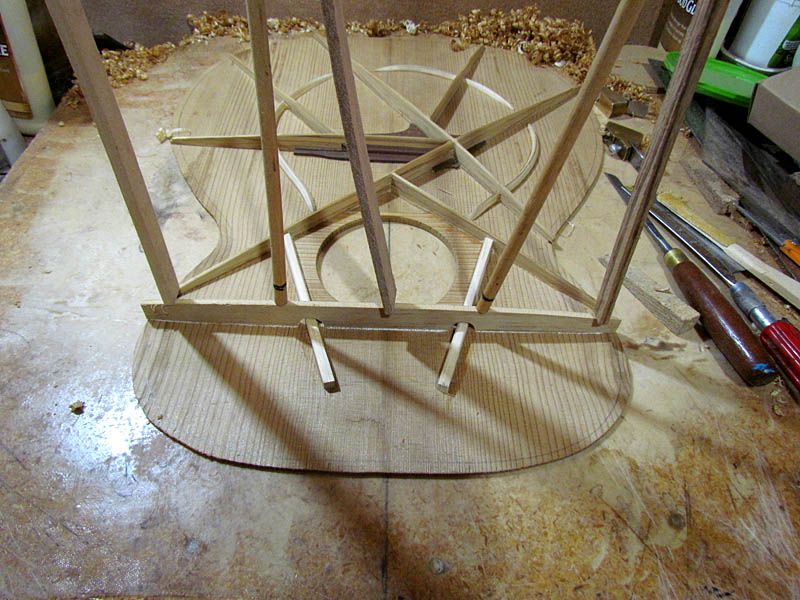
The braces on the left are done, those on the right are not
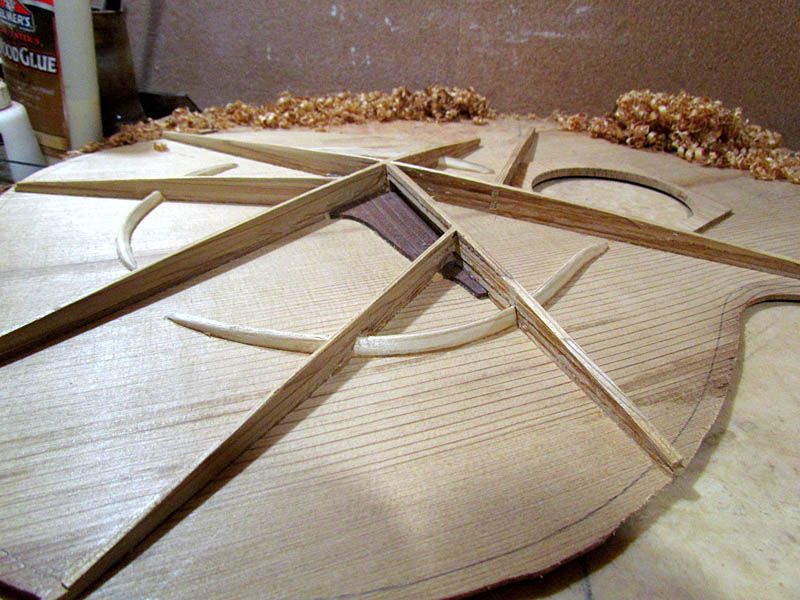
Here is the process
I start with a small plane to rough off much of the wood
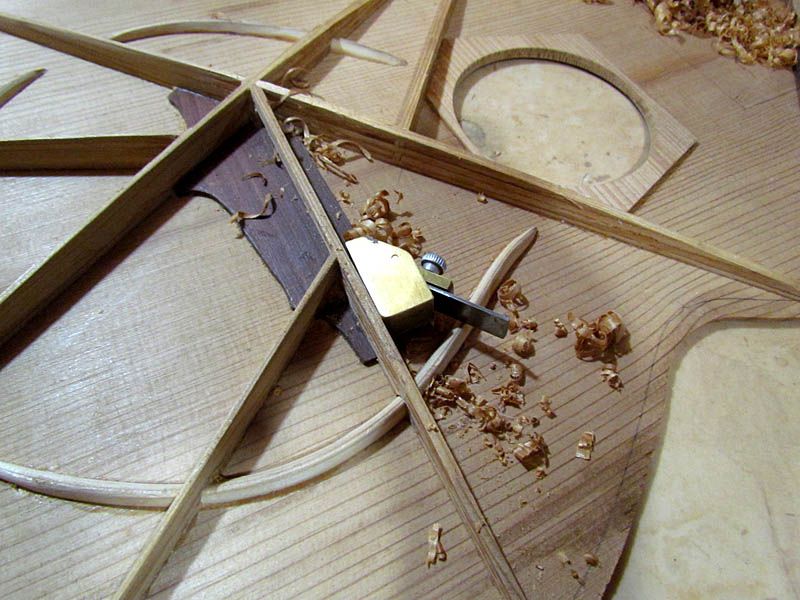
I use a sharp chisel to get into the brace intersections and anywhere else the plane can't reach

Then I use a thinned sanding block for the final shaping
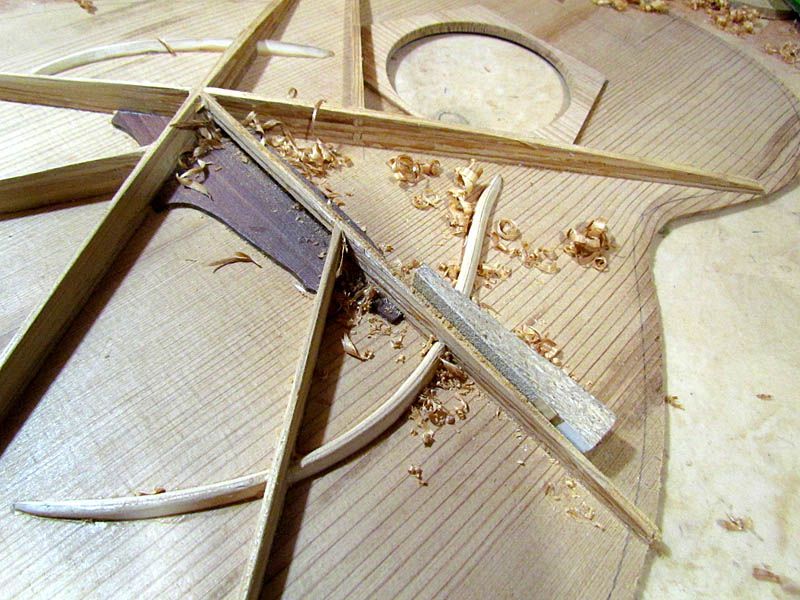
Here are the shaped braces
A low angle view
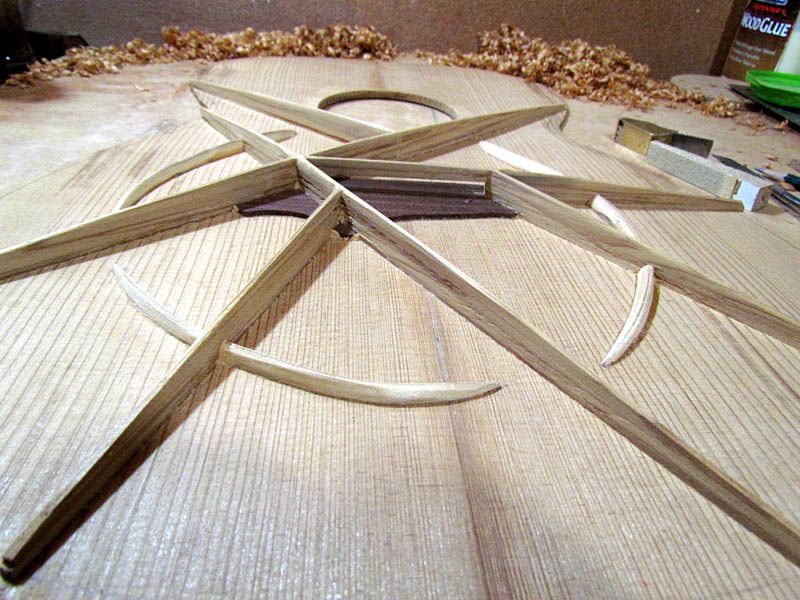
The braces at the upper bout end are not laminated, just regular solid wood
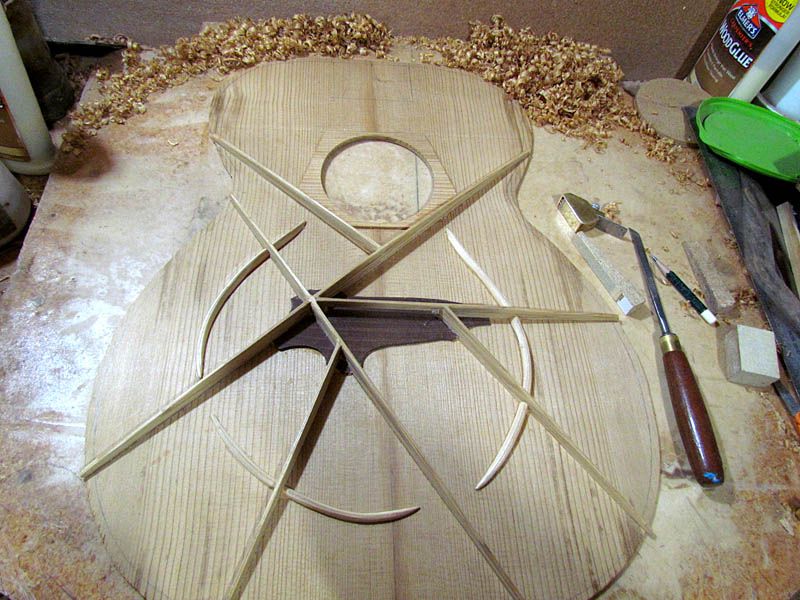
The total bracing pattern with all of the braces shaped
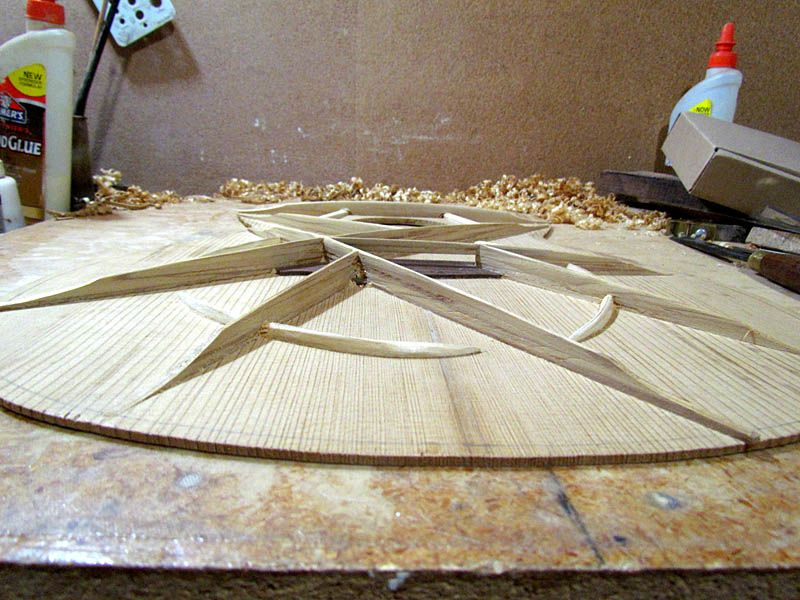
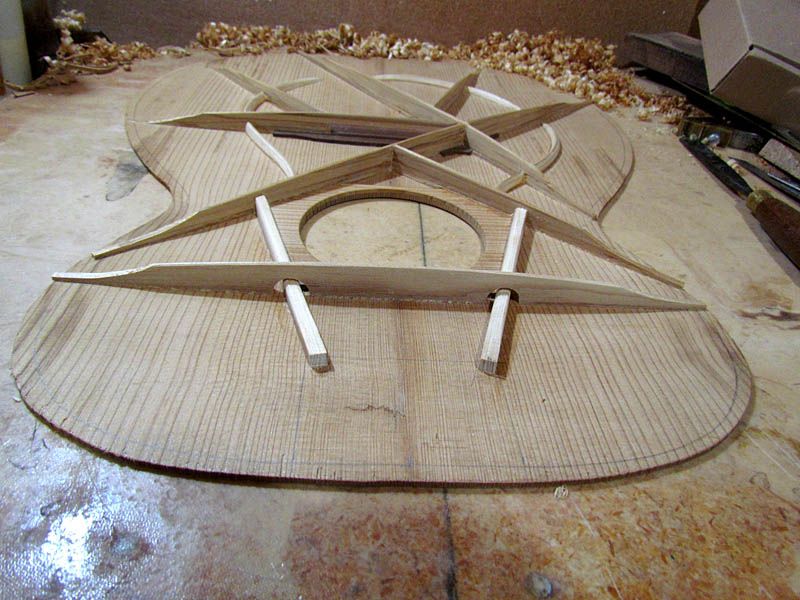
I will do some final sanding with finer grit, and clean things up a bit more, but this is basically done
I ended up doing pretty much the same as I have on non-thermally modified tops. I will be tapping a bit and may make some small adjustments. I do need to thin the top a bit more, but the final sanding should take care of that.
G
I have posted this process many times on other builds, but here it is again to show it can be done with thermally modified wood
I put an extra reinforcing patch around the soundhole, so that is the first step
Then I can cut the soundhole
The first actual braces are the bridge plate (thermally modified Osage Orange) and my infamous curved braces
I start my laminated braces with a first layer the same height as the thickness of the bridge plate
The rest of the laminations are a bit thicker
Here, all of the layers have been glued on
The next step is to plane the braces to final height
I give the braces a tapered cross section
The braces on the left are done, those on the right are not
Here is the process
I start with a small plane to rough off much of the wood
I use a sharp chisel to get into the brace intersections and anywhere else the plane can't reach
Then I use a thinned sanding block for the final shaping
Here are the shaped braces
A low angle view
The braces at the upper bout end are not laminated, just regular solid wood
The total bracing pattern with all of the braces shaped
I will do some final sanding with finer grit, and clean things up a bit more, but this is basically done
I ended up doing pretty much the same as I have on non-thermally modified tops. I will be tapping a bit and may make some small adjustments. I do need to thin the top a bit more, but the final sanding should take care of that.
G
-
BRuddy
- Posts: 1104
- Joined: Mon Aug 25, 2008 6:31 pm
- Include Off Topic: Yes
- Location: Keweenaw Bay, MI (the Upper Peninsula, eh?)
Re: Documenting my first total thermally modified build
I love your bracing system Grant, and enjoy the heck out of watching the process every time. Can't wait to hear what this one sounds like. Thanks for breaking new thermo ground here!
Brian
Brian
Brian R, N8ZED
"Still traveling through the universe at 33.7 million kilometers a day on Starship Earth - and enjoying the ride!."
"Still traveling through the universe at 33.7 million kilometers a day on Starship Earth - and enjoying the ride!."