
Very interesting build, Grant! I love the look of the finish! How does the guitar feel with respect to weight? I build fairly traditionally and do not scallop braces, but when someone plays one of my guitars, they always remark that it feels "heavy." Of course, that may be the trade-off for a good sounding guitar! I really liked your explanation of your bracing pattern from the carpenter's point of view.
Mark
Monkeypod Dread
-
whitespruce

- Site Admin
- Posts: 4367
- Joined: Thu Aug 21, 2008 6:53 am
- Include Off Topic: Yes
- Location: Northern Minnesota, USA
Re: Monkeypod Dread
Well, I didn't notice any problems with things getting blotchy, but this wood has so many variations in the color that it may tend to hide that sort of thing.
Ya, I did the mineral oil thing first and it seemed to work fine. I was not sure when or how to use the pumice, so I winged it and did it after a couple goats of the shellac. All I accomplished was wearing holes in the covering of my pad. That might be because I didn't have any linen and used cotton. Christy has a bazillion boxes of fabric, but the only one she was sure was linen was a dark hot pink color and I didn't trust that not to bleed onto the guitar.
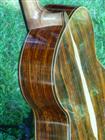
This guitar is fairly light in weight. I have two densities of the monkeypod and I used the lighter one..a tad less dense than mahogany. It had a tendency to get a bit fuzzy with coarser sanding. That's the main reason that I did the initial coats of shellac. But with the later sanding it was just fine.
G
Ya, I did the mineral oil thing first and it seemed to work fine. I was not sure when or how to use the pumice, so I winged it and did it after a couple goats of the shellac. All I accomplished was wearing holes in the covering of my pad. That might be because I didn't have any linen and used cotton. Christy has a bazillion boxes of fabric, but the only one she was sure was linen was a dark hot pink color and I didn't trust that not to bleed onto the guitar.
This guitar is fairly light in weight. I have two densities of the monkeypod and I used the lighter one..a tad less dense than mahogany. It had a tendency to get a bit fuzzy with coarser sanding. That's the main reason that I did the initial coats of shellac. But with the later sanding it was just fine.
G
-
barefootdesigns

- Posts: 15
- Joined: Sat Aug 23, 2008 7:08 pm
- Include Off Topic: Yes
- Location: Storrs, CT USA
- Contact:
Re: Monkeypod Dread
Grant,
Nice looking guitar. I'm very curious about monkey pod and the sound it produces. VERY curious. You'll have to give us an appraisal and some sound files when you get a chance.
It's nice to be back to the forum, catching some old friends.
C
Nice looking guitar. I'm very curious about monkey pod and the sound it produces. VERY curious. You'll have to give us an appraisal and some sound files when you get a chance.
It's nice to be back to the forum, catching some old friends.
C
Re: Monkeypod Dread
Is there some write up about doing these shellac finishes?
I really want to do Shellac... and have used Spray shellac, which was harder and more durable than anyone gives it credit for... but it is a royal pain.
Thanks
John
I really want to do Shellac... and have used Spray shellac, which was harder and more durable than anyone gives it credit for... but it is a royal pain.
Thanks
John
-
WaddyT
- Moderator
- Posts: 2018
- Joined: Sat Aug 23, 2008 6:29 pm
- Include Off Topic: Yes
- Location: Charlotte NC
- Contact:
Re: Monkeypod Dread
The best information I have seen is the Milburn tutorial. It is a purely traditional approach, so may not be exactly like the variation that Grant is doing, but it is a good place to start.
-
whitespruce
- Site Admin
- Posts: 4367
- Joined: Thu Aug 21, 2008 6:53 am
- Include Off Topic: Yes
- Location: Northern Minnesota, USA
Re: Monkeypod Dread
I did get this finished and strung it up Friday night in time to take it to the show yesterday. A few little rough spots in the finish that I gotta polish out yet, but I am happy and learned a lot.
VERY happy with the tone. I think this is the loudest guitar I have built and very even tone. Monkeypod rocks!!
I have more photos, but need to upload them, yet. Well try to do that tonight.
Today I gotta work on getting some stuff ready to build another birchbark canoe. We are going to a 4 day show Thursday through Sunday this coming week and I am going to build a complete birchbark canoe there as a demonstration.
G
-
barefootdesigns
- Posts: 15
- Joined: Sat Aug 23, 2008 7:08 pm
- Include Off Topic: Yes
- Location: Storrs, CT USA
- Contact:
Re: Monkeypod Dread
Awesome! Could you post a picture of the canoe and maybew a few "in process" shots of the build. I've been wanting to build a canoe but haven't had the guts to start such a huge project, etc.
-
whitespruce
- Site Admin
- Posts: 4367
- Joined: Thu Aug 21, 2008 6:53 am
- Include Off Topic: Yes
- Location: Northern Minnesota, USA
Re: Monkeypod Dread
Well, here are a few of those photos I promised.
next thing I did was to make the bridge. I used a nice spiderwebby chunk of cocobolo that matched the fingerboard pretty well. Here I have layed it out and drilled and chamfered the bridge pin holes
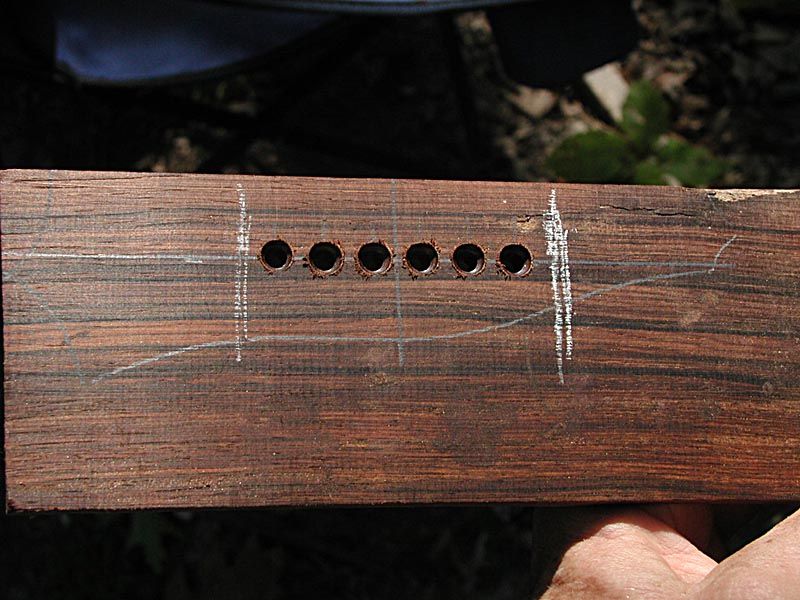
The check in the right hand end is shallow and will be sanded away when I thin the end.
Here I have routed the saddle slot
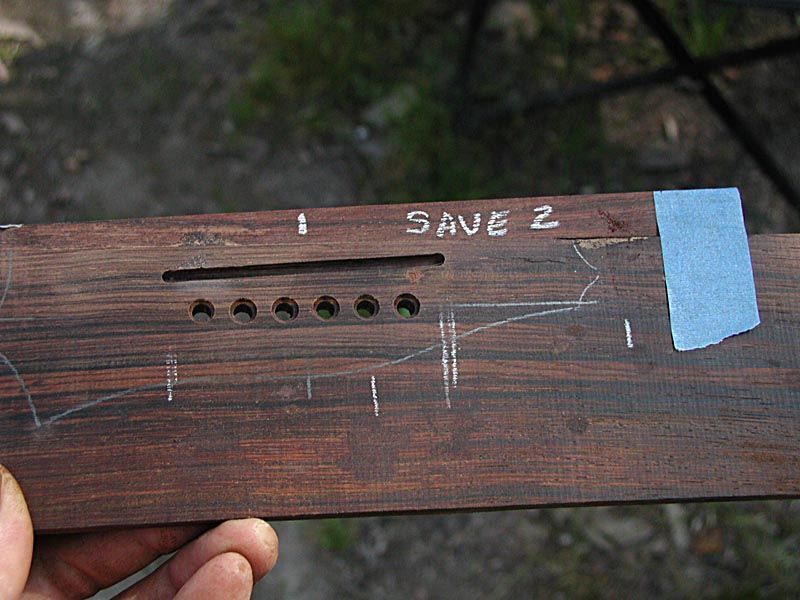
I tape a tapered shim on the edge to get the slot angle.....
.....and route it with this
This is my Gesswein high speed rorary tool. The base is home made and is a tight friction fit to the tool. Nothing is threaded on the tool body, but this works very well. I have on a fence that follows the tapered shim. I have several other fittings for this base for other tasks.
Here is the finished bridge sanded
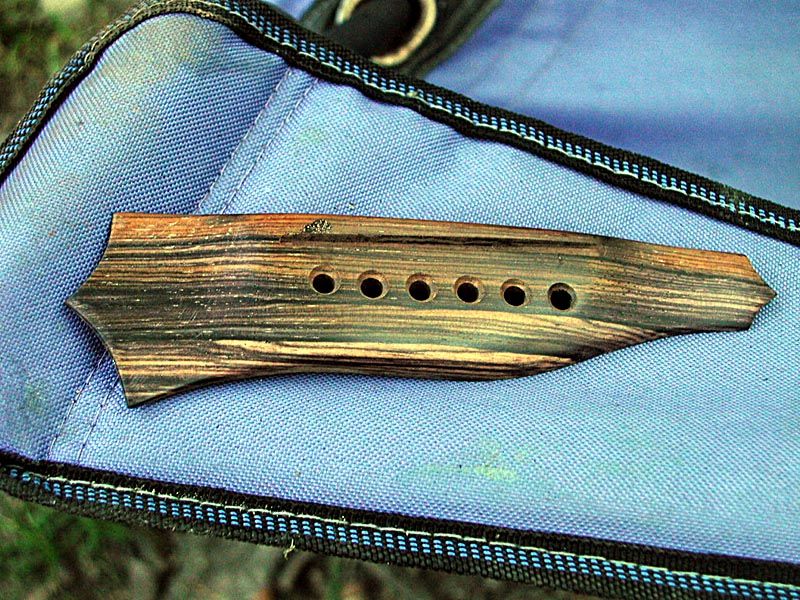
A bit of cleanup and polishing and it will be ready to install.
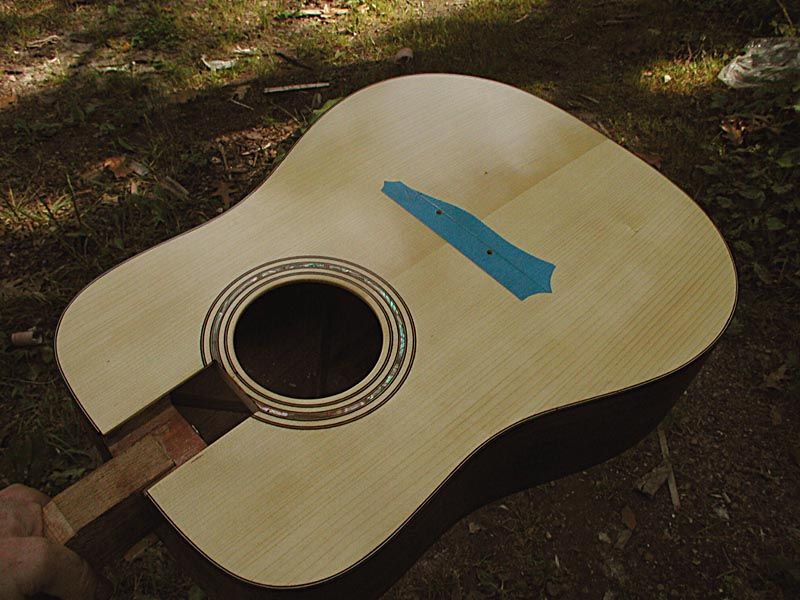
Here is the top with the bridge location masked out and the first few coats of French polish applied
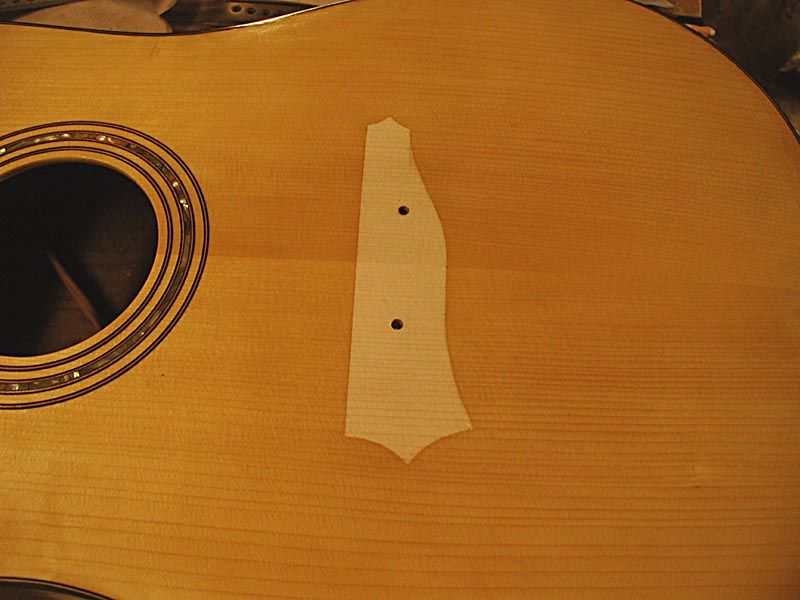
And here after the last coats and with the masking removed ready to glue on the bridge
And here is my 3 dollar vacuum clamping device in action
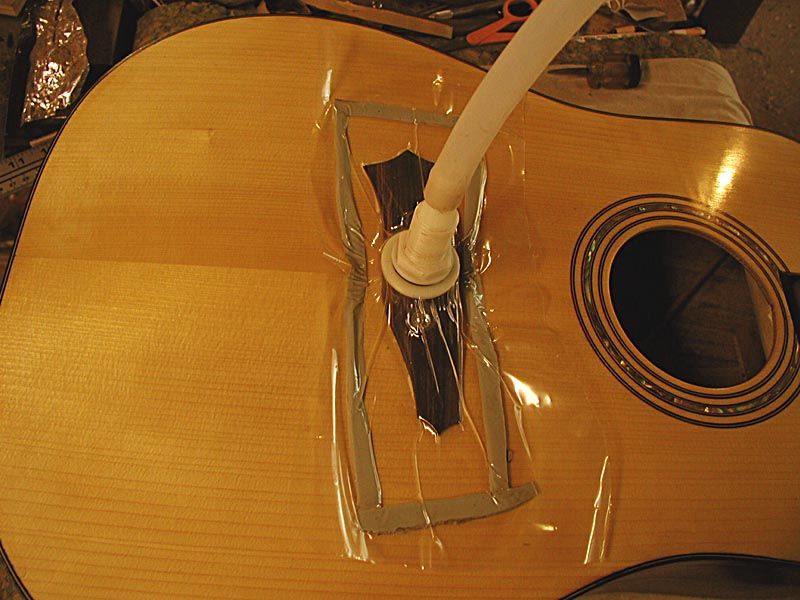
The 3 dollar is for the fitting to the hose. The rest is some scrap nylon bagging film and a short piece of sealant tape. Works like a charm. First i dry fit with gasketed bolts in the outer bridge pin holes. This is so there are no surprised. Then I remove it and apply the glue and bolt it back on. Get it perfectly positioned and tighten down the bolts. Then I apply the "dam" of sealant tape, put the bagging film on, and hit the switch on the vacuum pump. Let her run for an hour and all is well. Clean up the glue squeezeout with warm water on a small brush and let the glue finish drying. Then I can take out the bolts and drill the remaining 4 pin holes.
Need to take some photos of the finished beast all strung up, but have been too busy getting the canoe stuff ready. Some have asked, so I will start a canoe topic and show this one being made. I will be building the canoe at a big chainsaw carving competion south of Hackensack.
G
next thing I did was to make the bridge. I used a nice spiderwebby chunk of cocobolo that matched the fingerboard pretty well. Here I have layed it out and drilled and chamfered the bridge pin holes
The check in the right hand end is shallow and will be sanded away when I thin the end.
Here I have routed the saddle slot
I tape a tapered shim on the edge to get the slot angle.....
.....and route it with this
This is my Gesswein high speed rorary tool. The base is home made and is a tight friction fit to the tool. Nothing is threaded on the tool body, but this works very well. I have on a fence that follows the tapered shim. I have several other fittings for this base for other tasks.
Here is the finished bridge sanded
A bit of cleanup and polishing and it will be ready to install.
Here is the top with the bridge location masked out and the first few coats of French polish applied
And here after the last coats and with the masking removed ready to glue on the bridge
And here is my 3 dollar vacuum clamping device in action
The 3 dollar is for the fitting to the hose. The rest is some scrap nylon bagging film and a short piece of sealant tape. Works like a charm. First i dry fit with gasketed bolts in the outer bridge pin holes. This is so there are no surprised. Then I remove it and apply the glue and bolt it back on. Get it perfectly positioned and tighten down the bolts. Then I apply the "dam" of sealant tape, put the bagging film on, and hit the switch on the vacuum pump. Let her run for an hour and all is well. Clean up the glue squeezeout with warm water on a small brush and let the glue finish drying. Then I can take out the bolts and drill the remaining 4 pin holes.
Need to take some photos of the finished beast all strung up, but have been too busy getting the canoe stuff ready. Some have asked, so I will start a canoe topic and show this one being made. I will be building the canoe at a big chainsaw carving competion south of Hackensack.
G