
G.
Can you tell yet, how this wood compares to koa?
I heard the two are about the same density, so the
monkey-pod should make a good dobro
Regards
Allen
Monkeypod Dread
-
whitespruce

- Site Admin
- Posts: 4367
- Joined: Thu Aug 21, 2008 6:53 am
- Include Off Topic: Yes
- Location: Northern Minnesota, USA
Re: Monkeypod Dread
Well, I did a bit more this evening.
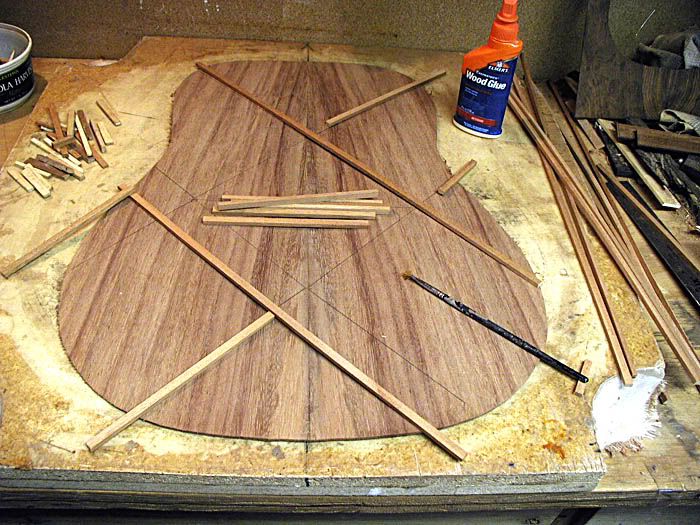
First, here is the top I am using.
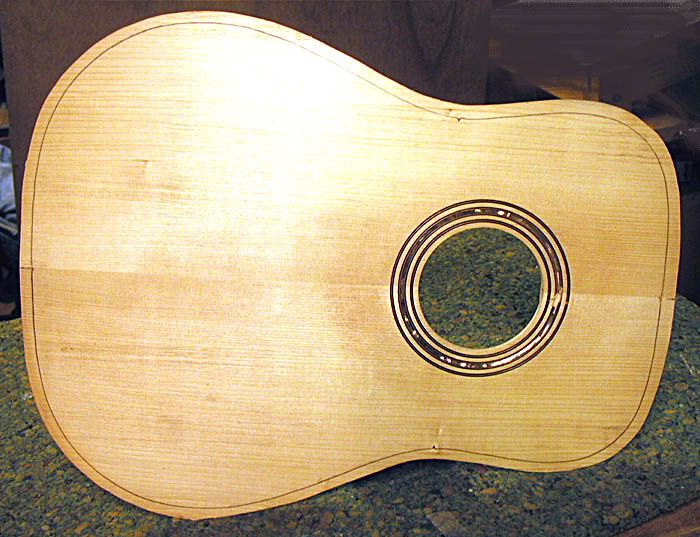
Another white spruce that I had glued up and put in the rosette 4 or 5 years ago.
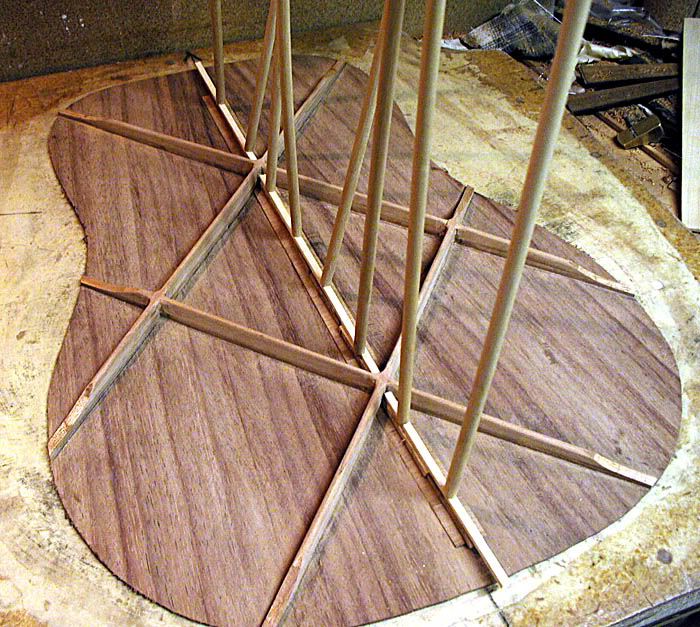
And here are the braces that I put on, I think last Fall....
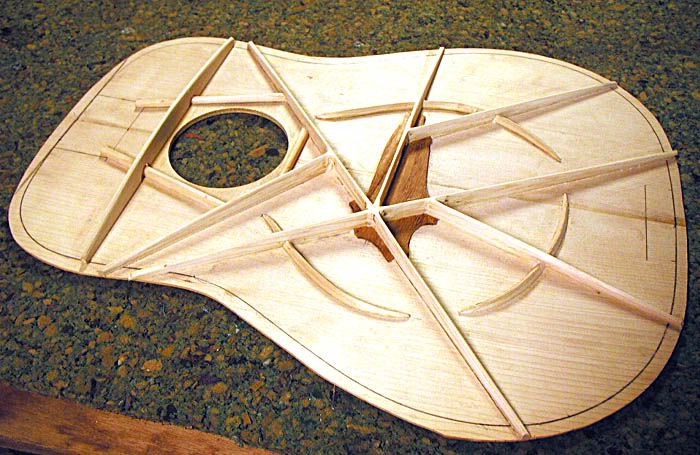
....after I spent a couple hours today sanding the braces. These are my laminated braces.
Here is the neck block....
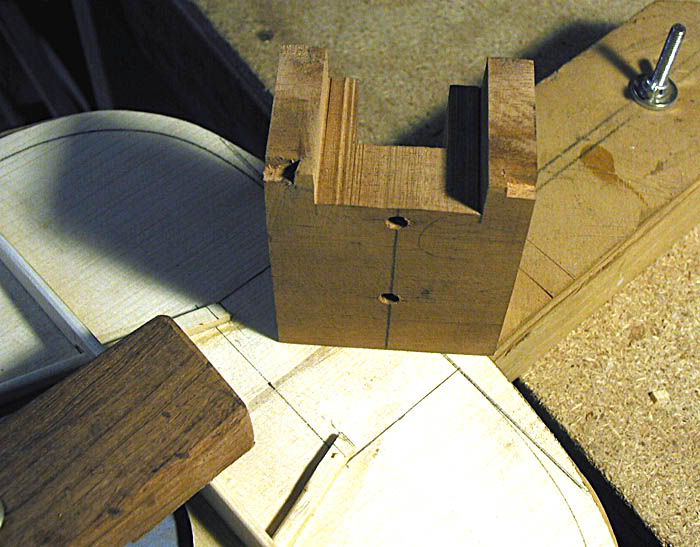
....after notching for the ends of the "A" braces.
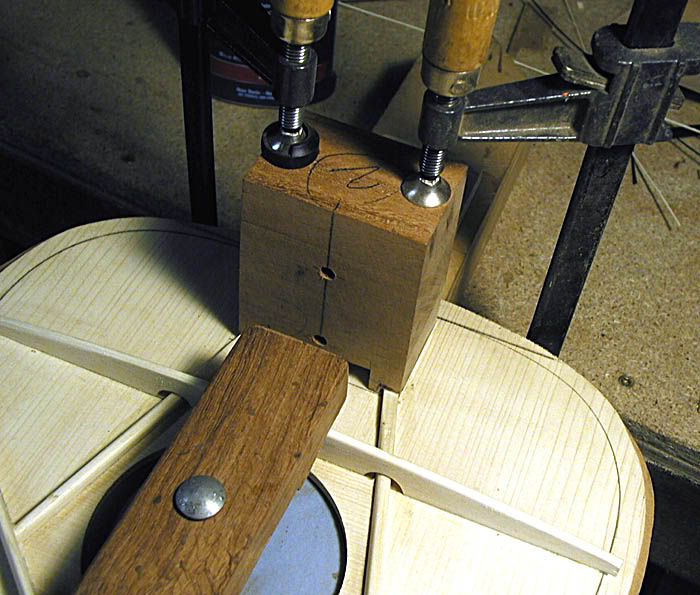
And here it is glued on.
And the tail block glued.
And a shot of the whole schmole.
Clamps off and the ends of the braces trimmed.
Here, the first side is fitted for marking the length and the end points for the linings.
As most of you probably know, I don't build with a mold, so the process is a bit different than most builds here. Next I fitted and marked the other side and then trimmed the excess length on the bandsaw.
And here are the top linings glued....
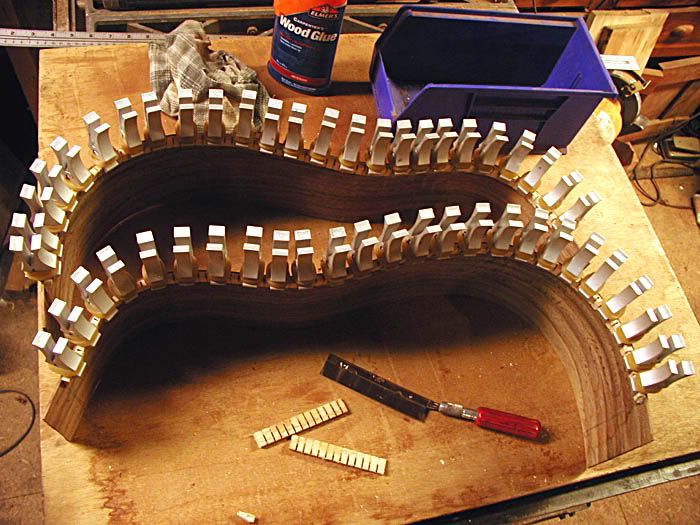
....with my fancy-schmancey clamps
I have been playing with my camera again on these. Geting way better colors and I don't have to try and adjust the color balance in Photoshop any more more. Thanks, Erik
If I get the back braced early enough tomorrow, I will try to have the box closed by tomorrow night. I have a few other things to do, but this ain't bad for deciding to build this yesterday afternoon
G
First, here is the top I am using.
Another white spruce that I had glued up and put in the rosette 4 or 5 years ago.
And here are the braces that I put on, I think last Fall....
....after I spent a couple hours today sanding the braces. These are my laminated braces.
Here is the neck block....
....after notching for the ends of the "A" braces.
And here it is glued on.
And the tail block glued.
And a shot of the whole schmole.
Clamps off and the ends of the braces trimmed.
Here, the first side is fitted for marking the length and the end points for the linings.
As most of you probably know, I don't build with a mold, so the process is a bit different than most builds here. Next I fitted and marked the other side and then trimmed the excess length on the bandsaw.
And here are the top linings glued....
....with my fancy-schmancey clamps
I have been playing with my camera again on these. Geting way better colors and I don't have to try and adjust the color balance in Photoshop any more more. Thanks, Erik
If I get the back braced early enough tomorrow, I will try to have the box closed by tomorrow night. I have a few other things to do, but this ain't bad for deciding to build this yesterday afternoon
G
-
Lefty

- Moderator
- Posts: 1632
- Joined: Sat Aug 23, 2008 9:09 pm
- Include Off Topic: Yes
- Location: Riverside,ca
Re: Monkeypod Dread
Wow Grant,
You are really moving. Gonna be a looker. I sure like that front bracing.
Lefty
You are really moving. Gonna be a looker. I sure like that front bracing.
Lefty
No money Nathan. No money Marty. Just a roof over my head and a rockin chair by the fire.
(Mose Harper)
Steve "Lefty" Leff
(Mose Harper)
Steve "Lefty" Leff
-
Joe Sustaire

- Moderator
- Posts: 2640
- Joined: Sat Aug 23, 2008 6:41 pm
- Include Off Topic: Yes
- Location: Talihina, Oklahoma
Re: Monkeypod Dread
Yeah, there's gotta be a show-off in every crowd!
But that's alright, gives us something to shoot for.
Looking fine Grant,
Joe
But that's alright, gives us something to shoot for.
Looking fine Grant,
Joe
"I tell you we are here on earth to fart around, and don't let anyone tell you any different!"
Kurt Vonnegut
Kurt Vonnegut
-
whitespruce
- Site Admin
- Posts: 4367
- Joined: Thu Aug 21, 2008 6:53 am
- Include Off Topic: Yes
- Location: Northern Minnesota, USA
Re: Monkeypod Dread
Well, I farted around a bit more today than I planned. Didn't even get out to the shop until after lunch  And then this afternoon I spent a couple of hours out in our garden tunnels and hiking out in the woods to the peat mine to get some dirt so Christy could transplant tomato plants.
But I did make progress on the guitar
Here are the top linings after removing the clamps.
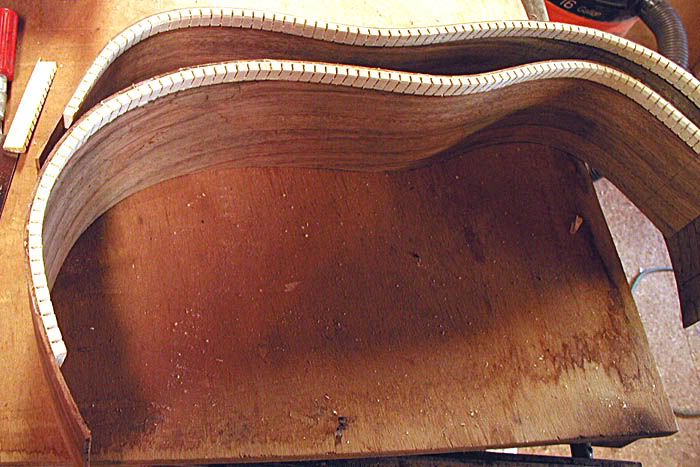
Then I clamped a big long sheet of sandpaper to the top of the table saw and sanded the lined edge perfectly flat.
So here is the first side being glued in.
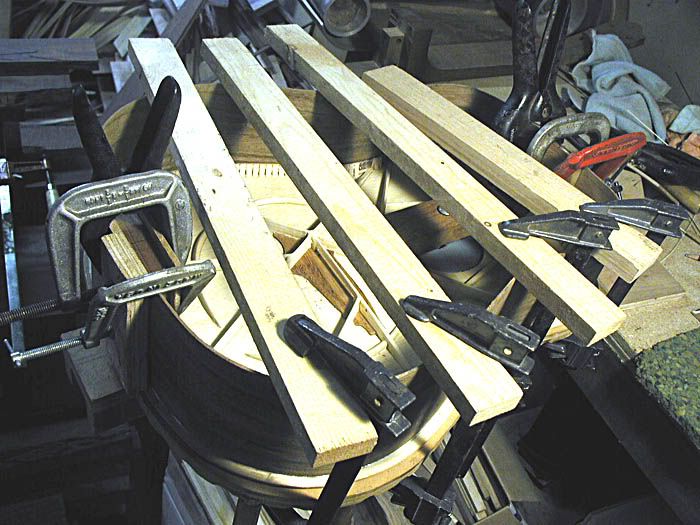
The far side is in place just to support the clamping crosspieces. I clamp the sides down to the top while the ends of the side are just held to the blocks with spring clamps. The body outline is drawn on the inside of the top, and I just adjust the sides to the line as I clamp. Loosen and reclamp as needed. Then I clamp the cork lined cauls at the end blocks tightly with C-clamps. When the first side is dry, I repeat the process on the other side.
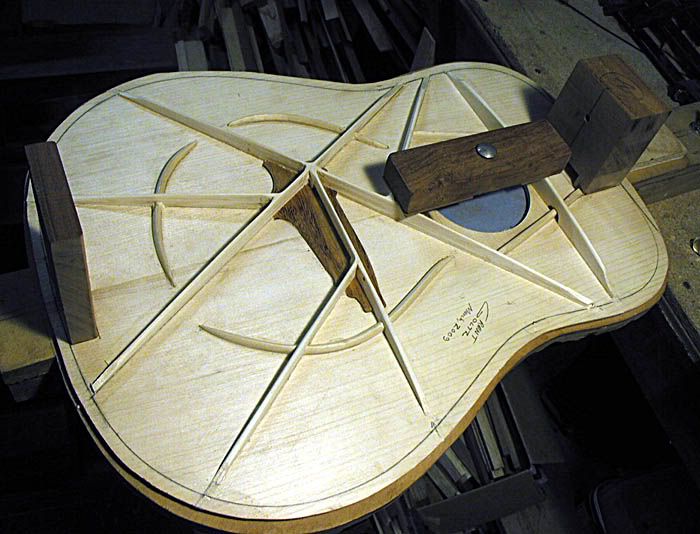
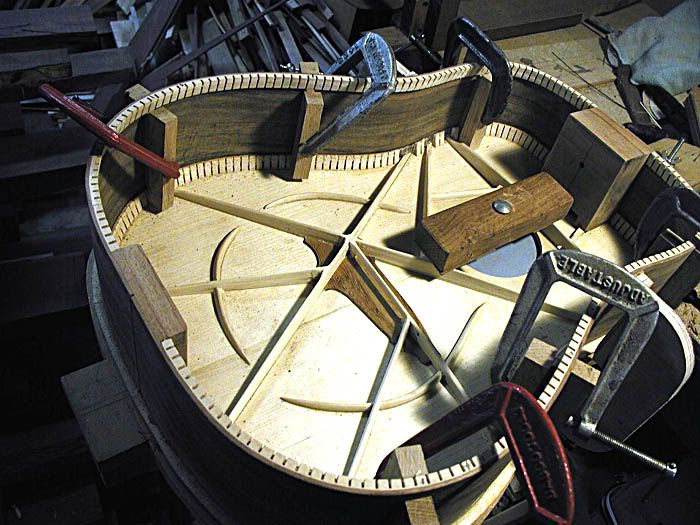
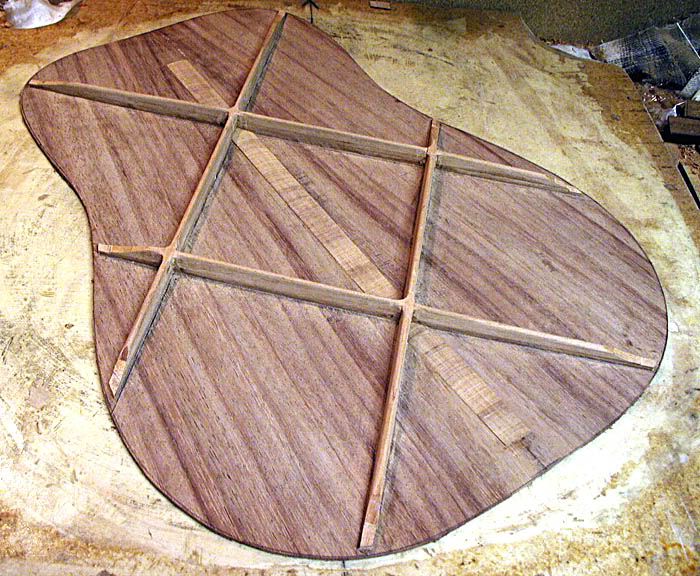
Another task today was to brace the back. I used my laminated X bracing.
Here is the layout.
I use a small triangle to lay out the center section. It is just a square, 6" on a side, approximately centered on the back, diagonally. Then I extend the lines by placing a ruler against the triangle. Takes just a few minutes.
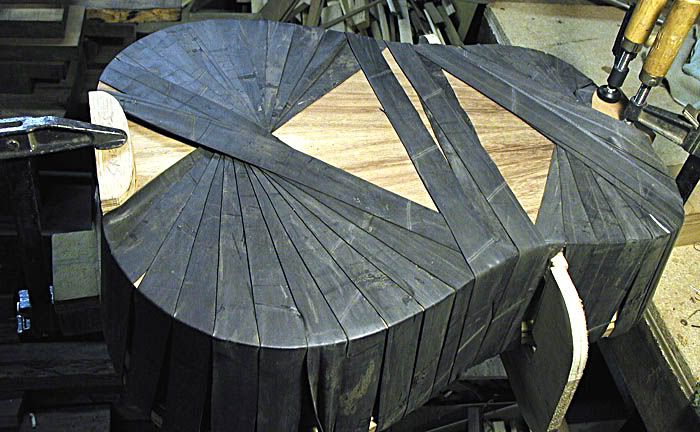
Here are the pieces for the first layer.
I use 4 layers, alternating the full length diagonals with each layer to lock the X crossings.
Here is the first layer glued.
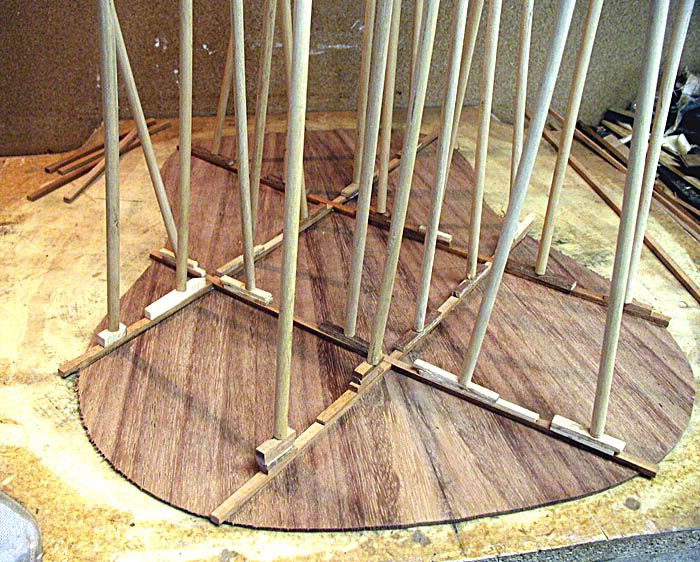
Just keep adding layers as the glue dries. The last layer is a bit thinner than the first 3. It is important to get the first 2 layers perfectly stacked. If the last 2 layers are a bit off, the routing cleans them up fine.
All the layers glued.

And routed with my remodeled tapered bit.
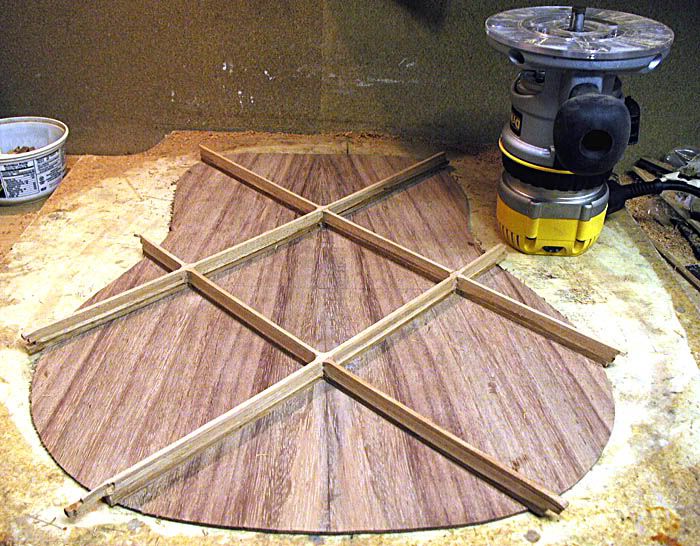
I used my regular router on this because I can set the speed slower. Each side of the braces ends up being tapered about 1/16" inward.
Here they are all sanded and with the ends trimmed.

So the back is almost ready to go. Just need to add the center crossgrain strip. I left it out until after routing and sanding the braces to make that easier.
I have to say that I really like this back bracing. The unbraced back had a rather dead sounding tap. With this bracing it really rings. And it holds the shape very well.
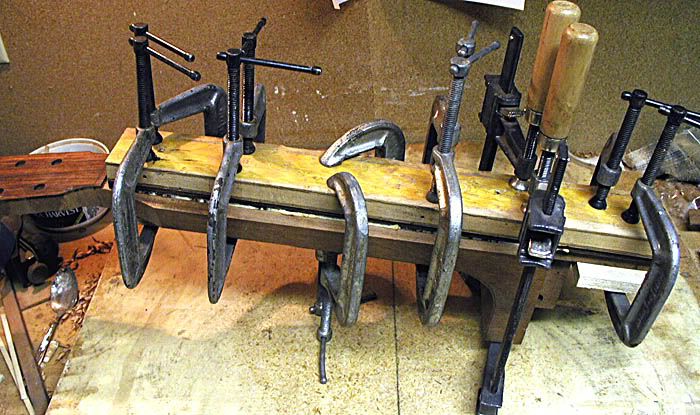
I put the dish mold onto the sides and traced around under it to mark the high spots on the sides. Then I used the block plane to do the small bit of trimming needed and finished by pulling a piece of coarse sandpaper between the dish mold and the sides to even things up a bit more.
Then I glued on the back linings.
Notice I had to add a thin piece to buld up the neck block a bit. And I did clean up the glue run on the far side. Kinda looks like a huge crown roast with all those clamp ends sticking up
So that's all I did today. I have to clean up the neck block and get the bottom of it shaped, glue in the side braces and the crossgrain strip in the back, and cut the brace pockets in the back linings. Then I can glue on the back and it will be closed up. Maybe get that done tomorrow night.
G
But I did make progress on the guitar
Here are the top linings after removing the clamps.
Then I clamped a big long sheet of sandpaper to the top of the table saw and sanded the lined edge perfectly flat.
So here is the first side being glued in.
The far side is in place just to support the clamping crosspieces. I clamp the sides down to the top while the ends of the side are just held to the blocks with spring clamps. The body outline is drawn on the inside of the top, and I just adjust the sides to the line as I clamp. Loosen and reclamp as needed. Then I clamp the cork lined cauls at the end blocks tightly with C-clamps. When the first side is dry, I repeat the process on the other side.
Another task today was to brace the back. I used my laminated X bracing.
Here is the layout.
I use a small triangle to lay out the center section. It is just a square, 6" on a side, approximately centered on the back, diagonally. Then I extend the lines by placing a ruler against the triangle. Takes just a few minutes.
Here are the pieces for the first layer.
I use 4 layers, alternating the full length diagonals with each layer to lock the X crossings.
Here is the first layer glued.
Just keep adding layers as the glue dries. The last layer is a bit thinner than the first 3. It is important to get the first 2 layers perfectly stacked. If the last 2 layers are a bit off, the routing cleans them up fine.
All the layers glued.
And routed with my remodeled tapered bit.
I used my regular router on this because I can set the speed slower. Each side of the braces ends up being tapered about 1/16" inward.
Here they are all sanded and with the ends trimmed.
So the back is almost ready to go. Just need to add the center crossgrain strip. I left it out until after routing and sanding the braces to make that easier.
I have to say that I really like this back bracing. The unbraced back had a rather dead sounding tap. With this bracing it really rings. And it holds the shape very well.
I put the dish mold onto the sides and traced around under it to mark the high spots on the sides. Then I used the block plane to do the small bit of trimming needed and finished by pulling a piece of coarse sandpaper between the dish mold and the sides to even things up a bit more.
Then I glued on the back linings.
Notice I had to add a thin piece to buld up the neck block a bit. And I did clean up the glue run on the far side. Kinda looks like a huge crown roast with all those clamp ends sticking up
So that's all I did today. I have to clean up the neck block and get the bottom of it shaped, glue in the side braces and the crossgrain strip in the back, and cut the brace pockets in the back linings. Then I can glue on the back and it will be closed up. Maybe get that done tomorrow night.
G
-
Bilbert
- Site Admin
- Posts: 929
- Joined: Thu Aug 21, 2008 8:09 am
- Include Off Topic: Yes
- Location: Tampa, FL
Re: Monkeypod Dread
Hey Grant - looking good! What are you using for the heel block - from your pic's it looks like the wood is darker than Mahogany.
Thanks!
Bill
Thanks!
Bill
Bill Bertolino
I'm watchin' TV in the window of a furniture store................. T Waits.
I'm watchin' TV in the window of a furniture store................. T Waits.
-
whitespruce
- Site Admin
- Posts: 4367
- Joined: Thu Aug 21, 2008 6:53 am
- Include Off Topic: Yes
- Location: Northern Minnesota, USA
Re: Monkeypod Dread
Bill, the heel block just looks dark because I had some pencil marks rubbed on it.
Worked some more this afternoon and a bit this evening.
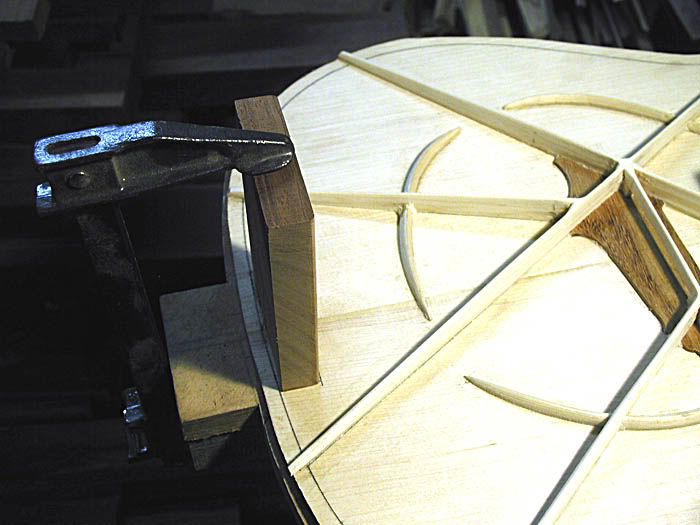
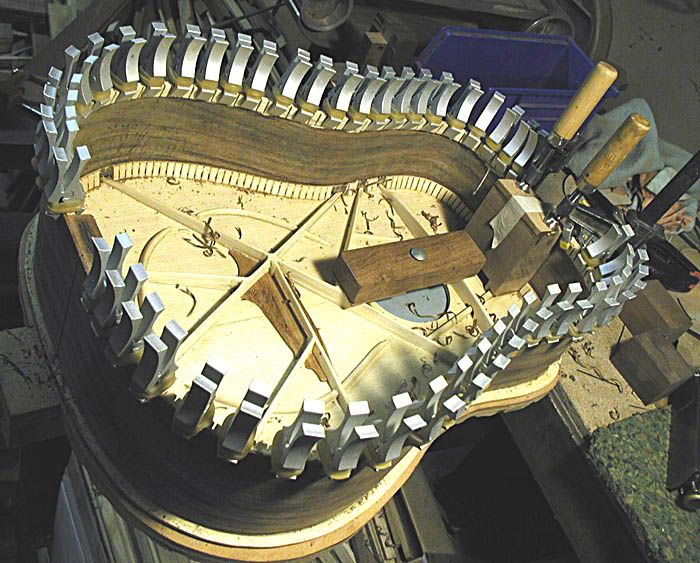
First I glued in the side braces.
All that shows here is the clamps and cauls. The actual side braces are 5/16" square mahogany.
Then I glued in the center back strip.
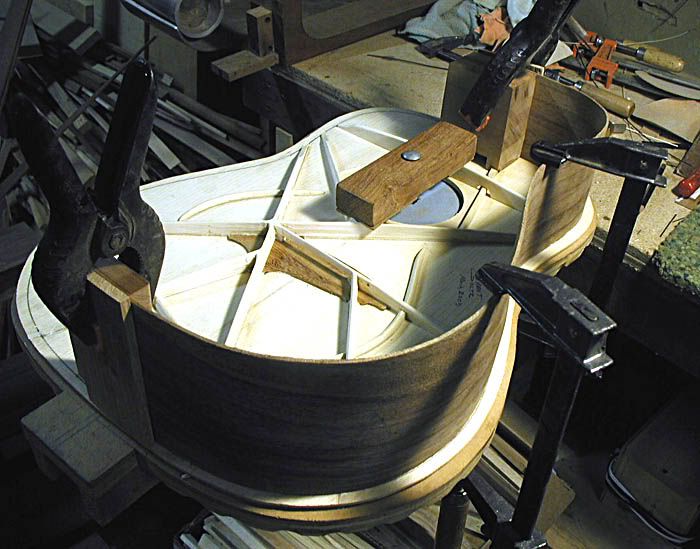
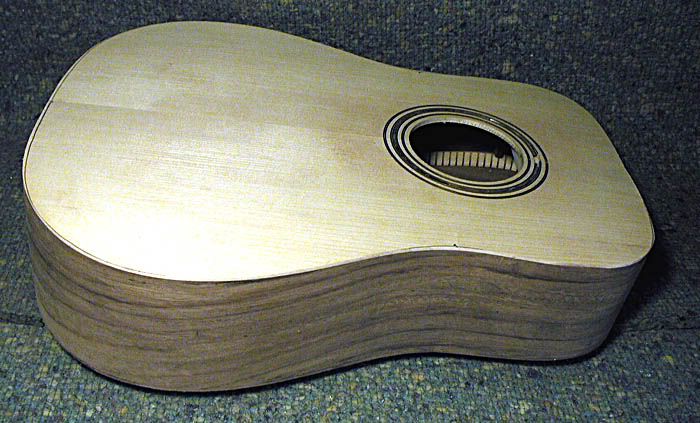
And here is the box ready for the back.
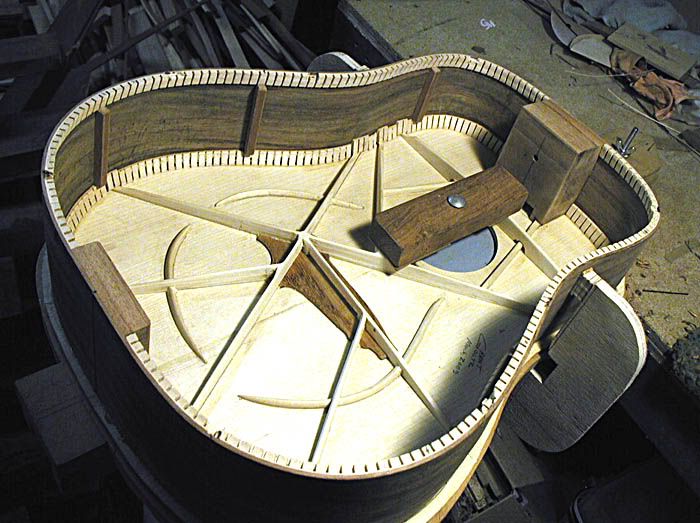
I have glued in the lining blocks over the top braces and notched the back linings for the back braces.
Here is the back ready to go on.
The brace ends are trimmed and I marked the back overhang and bandsawed it off.
And the back clamped and roped on.
I use clamps and cork lined cauls over the blocks and my big long innertube strip.
Then I glued the fingerboard on to the neck.
I drill a 1/16" hole in the first and 12th fret and drive in 16 guage brads as registration pins.
Here it is after gluing.
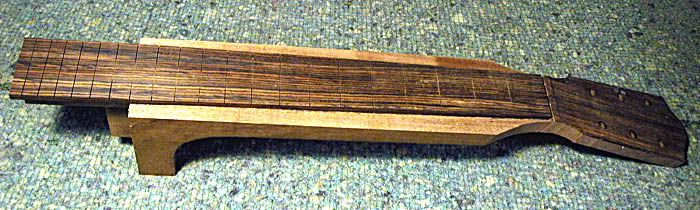
Nice striped cocobolo fingerboard. I glued it with Elmer's Carpenter's Wood Glue. And in case you are wondering, no, there is absolutely no backbow
So here is the box after unclamping and trimming the top and back edges.
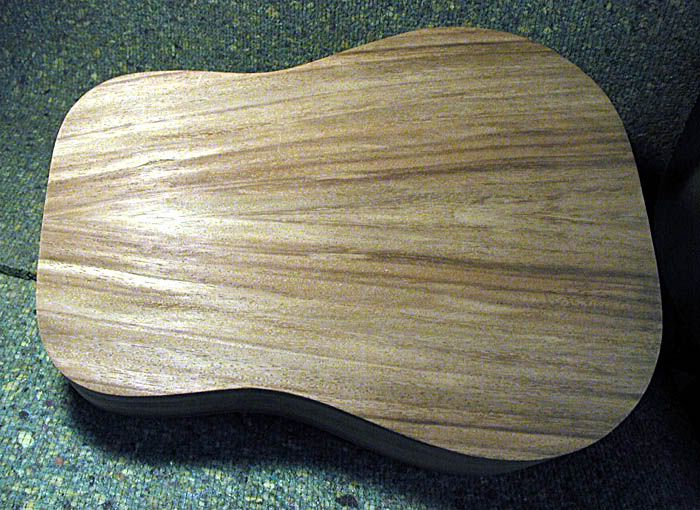
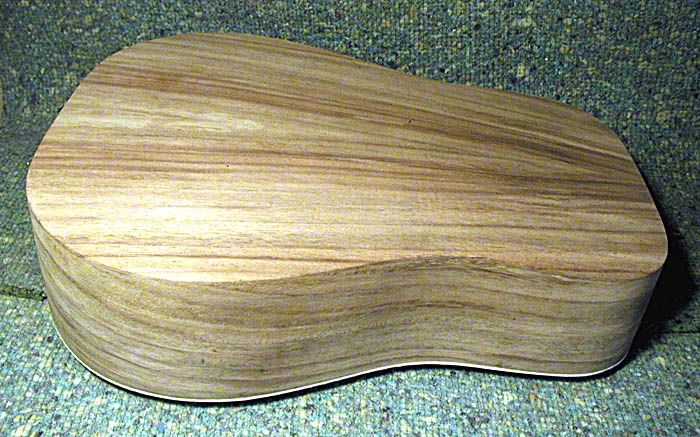
Just a light sanding to clean up most of the dirt and rough edges.
Now, if you thought it looks like mahogany in the above photos, check these out.
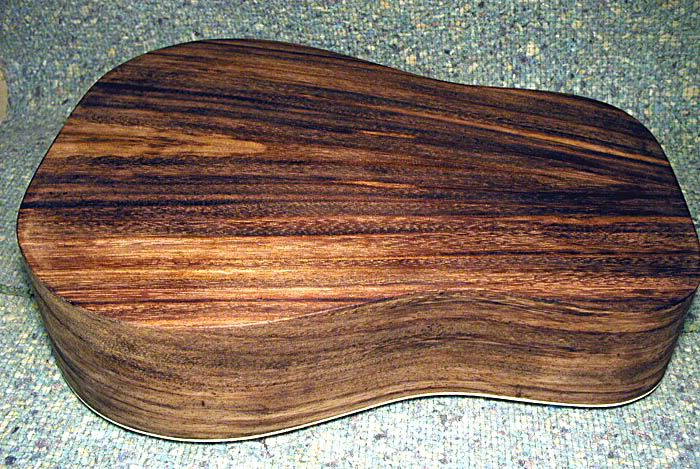
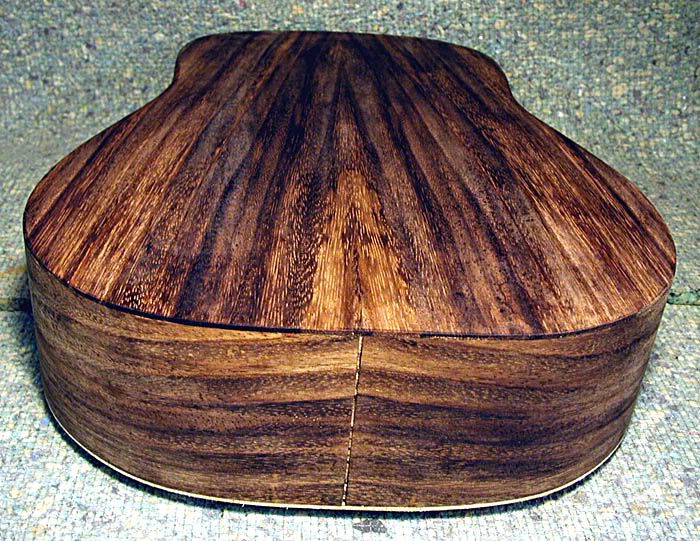
Just a seal coat of shellac rubbed on. Not even fine sanded yet, but you can get an idea of the dark colors of this wood. Will not look at all like mahogany with a finish.
Questions or comments welcome.
G
Worked some more this afternoon and a bit this evening.
First I glued in the side braces.
All that shows here is the clamps and cauls. The actual side braces are 5/16" square mahogany.
Then I glued in the center back strip.
And here is the box ready for the back.
I have glued in the lining blocks over the top braces and notched the back linings for the back braces.
Here is the back ready to go on.
The brace ends are trimmed and I marked the back overhang and bandsawed it off.
And the back clamped and roped on.
I use clamps and cork lined cauls over the blocks and my big long innertube strip.
Then I glued the fingerboard on to the neck.
I drill a 1/16" hole in the first and 12th fret and drive in 16 guage brads as registration pins.
Here it is after gluing.
Nice striped cocobolo fingerboard. I glued it with Elmer's Carpenter's Wood Glue. And in case you are wondering, no, there is absolutely no backbow
So here is the box after unclamping and trimming the top and back edges.
Just a light sanding to clean up most of the dirt and rough edges.
Now, if you thought it looks like mahogany in the above photos, check these out.
Just a seal coat of shellac rubbed on. Not even fine sanded yet, but you can get an idea of the dark colors of this wood. Will not look at all like mahogany with a finish.
Questions or comments welcome.
G
-
Lefty
- Moderator
- Posts: 1632
- Joined: Sat Aug 23, 2008 9:09 pm
- Include Off Topic: Yes
- Location: Riverside,ca
Re: Monkeypod Dread
Grant,
Man, your screamin along on this one. Looks great. That grain sure popped when you put some finish on it.
Lefty
Man, your screamin along on this one.
Lefty
No money Nathan. No money Marty. Just a roof over my head and a rockin chair by the fire.
(Mose Harper)
Steve "Lefty" Leff
(Mose Harper)
Steve "Lefty" Leff